Search The Support Knowledgebase


(database of technical support questions and answers):
   

Author Topic: ZTLS (Zappadoc Traction Loss System) Installation

Offline zappadoc

  • Management
  • Suppreme Master Sensei
  • *
  • *
  • *
  • Posts: 5760
  • No email or PM support
    • ZDoc Dev Blog
ZTLS (Zappadoc Traction Loss System) Installation
« on: October 09, 2020, 07:22:12 AM »
IMPORTANT:

Read the topic about parts list and mounting first:
https://www.eksimracing.org/forum/index.php?topic=5151.0

BEFORE installing the ZTLS, follow the instructions to connect your SCN6 to your PC and to install MotionMax Manager software. For now just put the SCN6 on floor or on table. All actuators must be centered by MotionMax BEFORE setting up your simulator


A support surface of the simulator with a mix of MDF 20mm + Plexiglass (acrylic) is recommended, quieter than other materials


The position of the TL actuator and the coefficient of friction are also very important to minimize the force required to move the simulator.

To reduce the coefficient of friction to its minimum the total weight must be balanced, the rolling surface must be perfectly flat, impact-resistant and distortion-free. I use 2 x 360 degrees roller ball caster (each have a minimum load of 330 lbs / 150 Kg).

I always suggest dividing the total length of the base of the simulator into 5 equal zones
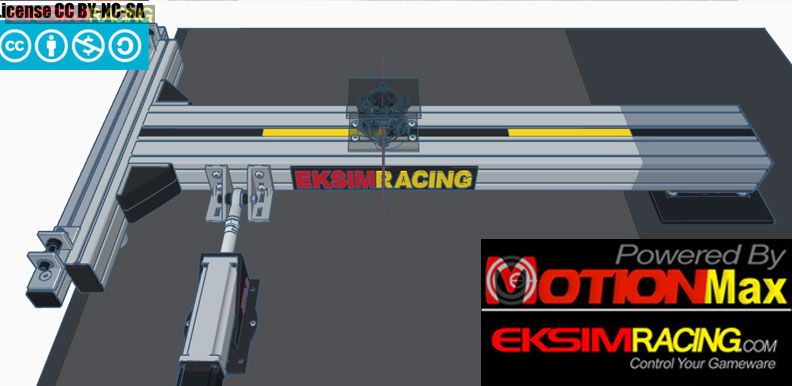


The pivot must be solid and placed between the second and third zone.

The TL actuator must placed in the rear position at 20 cm back to the pivot


No support will be provided by PM or EMAIL, PM has been disabled due to heavy spam and abuse, please post in the support boards, thanks for your understanding.

Offline zappadoc

  • Management
  • Suppreme Master Sensei
  • *
  • *
  • *
  • Posts: 5760
  • No email or PM support
    • ZDoc Dev Blog
Re: ZTLS (Zappadoc Traction Loss System) Installation
« Reply #1 on: October 21, 2020, 05:59:18 PM »
A plate of Plexiglass (acrylic) is used for the rolling surface (20mm thickness) less noisy than metal/alu/wood

Here in pictures the order of assembly of the ZTLS elements:


On simulator side:

there must be a play of 2 mm on each side of the rod-end (between the rubber grommet and the rod end )

You need to drill a hole on 40x80 bracket for the M8x75 screw

No support will be provided by PM or EMAIL, PM has been disabled due to heavy spam and abuse, please post in the support boards, thanks for your understanding.