Frequently Asked Questions and Answers
To search the Frequently Asked Questions (FAQs), enter your search terms or questions in the box below
0 The Most Common
Configure AMS2 to “Use Shared memory”?
Each time you upgrade Project CARS don’t forget to check the status of Shared memory in System Settings.
Automobilista 2
To turn ON telemetry go to SYSTEM > Use Shared Memory > Project CARS 2
Check the plugin page to get the latest info, HERE.

Configure simulation and game to send telemetry
 Configure your game or simulation
Each game or simulation need to be configured to send telemetry data and to get it working with USB Shiftlights Device or to disable its native support of Fanatec or Logitech led and digits to let the OpenSR handle them.
all updates information are available in Plugins Pages Forum
The plugins information page is a good source to know if your game is supported or not, check this HERE
Almost All Plugins are usually included in the installer of OpenSR. Select Check for updates to get the latest version of plugins and keep your installation up to date.
Which games are supported?
Any game can be supported by writing a dedicated Game plugin. OpenSR will support a wide range of major racing titles, including but not limited to
Read the FAQ: configure your game
American Truck Simulator
Assetto Corsa Pro**
Assetto Corsa
Assetto Corsa Competizione
Assetto Corsa EVO
Assetto Corsa Rally
Automobilista 2
BeamNG Drive
DCS Motion
DiRT4
DiRT Rally
DiRT Rally 2.0
EA F1 22
EA F1 23
EA F1 24
EA F1 25
EA Grid Legends
EA SPORTS WRC 2023
Euro Truck Simulator 2
F1 2010
F1 2011
F1 2012
F1 2013
F1 2014
F1 2015
F1 2016
F1 2017
F1 2018
F1 2019
F1 2020
F1 2021
Forza Horizon 4
Forza Horizon 5
Forza Horizon 6
Forza Motorsport 2023
GRID Autosport
GRID2
GT Legends
GTR2
iRacing
KartKraft
Le Mans Ultimate
Live For Speed
GRally*
GP Bikes*
Kart Racing Pro
MX Bikes
Project CARS
Project CARS 2
Project CARS 3*
Project Motor Racing
RaceRoom Racing Experience
rFactor
rFactor Pro**
rFactor 2
Richard Burns Rally
WRC Generations
Wreckfest 2
** special version for PRO available on demand, contact us


OTHERS
|
|
Check the plugins pages for more info… |


Configure Project CARS to “Use Shared memory”?
Each time you upgrade Project CARS don’t forget to check the status of Shared memory setting.
Project CARS 3
To turn ON telemetry go to SYSTEM > Use Shared Memory > Project CARS 2
Check the plugin page to get the latest info, HERE.

disable RPM/Gear feedback in Settings > Wheel & FFB

Project CARS 2
To turn ON telemetry go to SYSTEM > Use Shared Memory > Project CARS 2
Check the plugin page to get the latest info, HERE.

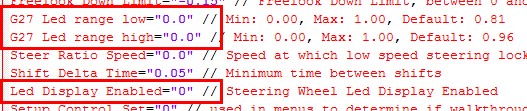
Also, if you have a Fanatec wheel disable RPM/Gear feedback in OPTIONS > CONTROLS > Configuration see the picture below:

Project CARS 1
To turn ON telemetry go to Gameplay > Use Shared Memory > Yes
Check the plugin page to get the latest info, HERE.

Also, if you have a Fanatec (CSW or others) wheel disable RPM/Gear feedback in Controls Setup see the picture below:

Related FAQ:
Configure your game or simulation to send telemetry data
For more info visit: https://www.eksimracing.org
How To Use Your Codemasters DiRT Rally 2.0, DiRT4 With Simucube FW or MMOS OSW?
UPDATED by Zappadoc 2019-02-26

How to get ffb with your Codemasters games DiRT Rally 2.0 and DiRT 4 using your simucube osw direct drive?
IMPORTANT: don’t trust guys around which give you the wrong information. Double check your device settings and compare with the line below, This is the correct way to declare your DD to be able to choose between Direct Drive driver and DR2.0 FFB settings, With the correct parameters this will greatly improve the FFB in Dirt Rally 2.0 and please add the link to this page which is updated regularly and do not just copy/past these info. Thanks.

The current DR2.0 FFB will not give you as much surface information as the DR1.0 but you can play with params to improve it. Beware all grayed settings are in fact perfectly usable. After a lot of game and simucube FFB tweaks, the feeling should be closer to DR1 but more attenuated unfortunately. We are all waiting for an FFB bug fix from Codemasters.

MMOS
DiRT 4 and DiRT Rally 2.0 MOD FOR SIMUCUBE MMOS MANAGEMENT
For OSW Simucube users, you have to enter the description of the device manually and create the corresponding generic actionmap file. I posted the instructions in Codemasters forum and here.
ATTENTION: THIS MOD DOESN’T CONTAIN ANY FFB PARAMETERS,
This allows the game to recognize the mmos device as a DD steering wheel only.
in game directory
input directory
device_defines.xml
after <!– comments –>
add this line:
<device id="{0FFBF055-0000-0000-0000-504944564944}" name="simucube_osw_mmos" priority="100" type="wheel" official="false" />
IMPORTANT: don’t trust guys around which give you the wrong information. Double check your device settings and compare with the line above, This is the correct way to declare your DD to be able to choose between Direct Drive driver and DR2.0 FFB settings, With the correct parameters this will greatly improve the FFB in Dirt Rally 2.0 and please add the link to this page which is updated regularly and do not just copy/past these info. Thanks.
in actionmap directory
create a xml file with Notepad++ named
simucube_osw_mmos.xml
with:
the xml file below is in attachment
<?xml version="1.0" encoding="utf-8"?>
<action_map name="simucube_osw_mmos" device_name="simucube_osw_mmos" library="lib_direct_input">
  <group name="driving">
    <action name="change_view">
      <axis name="di_button_6" />
    </action>
    <group name="gear">
      <group name="sequential">
        <action name="up">
          <axis name="di_button_10" />
        </action>
        <action name="down">
          <axis name="di_button_5" />
        </action>
      </group>
    </group>
    <action name="handbrake">
      <axis name="di_button_8" />
    </action>
    <action name="headlights">
      <axis name="di_button_11" />
    </action>
    <group name="look">
      <action name="back">
        <axis name="di_button_7" />
      </action>
    </group>
    <action name="pause">
      <axis name="di_button_14" />
    </action>
    <action name="reset_vehicle">
      <axis name="di_button_9" />
    </action>
    <action name="roadside_repair">
      <axis name="di_button_1" />
    </action>
    <group name="steer">
      <action name="left">
        <axis name="di_x_axis" type="lower" deadzone="0.0" saturation="1.0" />
      </action>
      <action name="right">
        <axis name="di_x_axis" type="upper" deadzone="0.0" saturation="1.0" />
      </action>
    </group>
    <action name="wipers">
      <axis name="di_button_13" />
    </action>
  </group>
  <group name="school">
    <action name="instructor_recap">
      <axis name="di_button_3" />
    </action>
  </group>
  <group name="menu">
    <group name="button">
      <action name="3">
        <axis name="di_button_2" />
      </action>
      <action name="4">
        <axis name="di_button_4" />
      </action>
      <action name="start">
        <axis name="di_button_1" />
      </action>
      <action name="select">
        <axis name="di_button_15" />
      </action>
      <group name="shoulder">
        <action name="left">
          <axis name="di_button_5" />
        </action>
        <action name="right">
          <axis name="di_button_10" />
        </action>
      </group>
    </group>
    <group name="navigate">
      <action name="back">
        <axis name="di_button_11" />
      </action>
      <action name="select">
        <axis name="di_button_13" />
      </action>
      <action name="cancel_keybinding">
        <axis name="di_button_14" />
      </action>
    </group>
    <group name="view">
      <action name="left">
        <axis name="di_x_axis" type="lower" deadzone="0.0" saturation="1.0" />
      </action>
      <action name="right">
        <axis name="di_x_axis" type="upper" deadzone="0.0" saturation="1.0" />
      </action>
    </group>
  </group>
  <group name="replay">
    <action name="exit">
      <axis name="di_button_11" />
    </action>
    <action name="forward">
      <axis name="di_x_axis" type="upper" deadzone="0.0" saturation="1.0" />
    </action>
    <action name="rewind">
      <axis name="di_x_axis" type="lower" deadzone="0.0" saturation="1.0" />
    </action>
    <action name="pause">
      <axis name="di_button_13" />
    </action>
    <group name="toggle">
      <action name="music">
        <axis name="di_button_6" />
      </action>
      <action name="ui">
        <axis name="di_button_12" />
      </action>
    </group>
    <group name="camera">
      <action name="previous">
        <axis name="di_button_5" />
      </action>
      <action name="next">
        <axis name="di_button_10" />
      </action>
    </group>
  </group>
  <group name="network">
    <group name="toggle">
      <action name="voice">
        <axis name="di_button_3" />
      </action>
    </group>
  </group>
</action_map>
DOWNLOAD simucube_osw_mmos xml
Unzip and copy the xml file in the correct directory
new “flavor” actionmap with minimal settings, use load preset in game settings to restore this minimal settings:
create a xml file with Notepad++ named
simucube_osw_mmos_minimal.xml
with:
<?xml version="1.0" encoding="utf-8"?>
<action_map name="simucube_osw_mmos_minimal" device_name="simucube_osw_mmos" library="lib_direct_input">
  <axis_defaults>
    <axis name="di_x_axis">
    <action deadzone="0" name="driving.steer.left" />
    <action deadzone="0" name="driving.steer.right" />
    </axis>
  </axis_defaults>
  <group name="driving">
    <group name="steer">
      <action name="left">
       <axis name="di_x_axis" type="lower" />
      </action>
     <action name="right">
      <axis name="di_x_axis" type="upper" />
    </action>
  </group>
 </group>
</action_map>
DOWNLOAD simucube_osw_mmos_minimal
Unzip and copy the xml file in the correct directory
Simucube FW
DiRT 4 and DiRT Rally 2.0 MOD FOR NATIVE SIMUCUBE FW MANAGEMENT

For OSW Simucube users, you have to enter the description of the device manually and create the corresponding generic actionmap file. I posted the instructions in Codemasters forum and here.
ATTENTION: THIS MOD DOESN’T CONTAIN ANY FFB PARAMETERS,
This allows the game to recognize the mmos device as a DD steering wheel only.
in game directory
input directory
device_defines.xml
after <!– comments –>
add this line:
<device id="{0D5A16D0-0000-0000-0000-504944564944}" name="simucube_osw" priority="100" type="wheel" official="false" />IMPORTANT: don’t trust guys around which give you the wrong information. Double check your device settings and compare with the line above, This is the correct way to declare your DD to be able to choose between Direct Drive driver and DR2.0 FFB settings, With the correct parameters this will greatly improve the FFB in Dirt Rally 2.0 and please add the link to this page which is updated regularly and do not just copy/past these info. Thanks.
in actionmap directory
create a xml file with Notepad++ named
simucube_osw.xml
with:
the xml file below is in attachment
<?xml version="1.0" encoding="utf-8"?>
<action_map name="simucube_osw" device_name="simucube_osw" library="lib_direct_input">
  <group name="driving">
    <action name="change_view">
      <axis name="di_button_6" />
    </action>
    <group name="gear">
      <group name="sequential">
        <action name="up">
          <axis name="di_button_10" />
        </action>
        <action name="down">
          <axis name="di_button_5" />
        </action>
      </group>
    </group>
    <action name="handbrake">
      <axis name="di_button_8" />
    </action>
    <action name="headlights">
      <axis name="di_button_11" />
    </action>
    <group name="look">
      <action name="back">
        <axis name="di_button_7" />
      </action>
    </group>
    <action name="pause">
      <axis name="di_button_14" />
    </action>
    <action name="reset_vehicle">
      <axis name="di_button_9" />
    </action>
    <action name="roadside_repair">
      <axis name="di_button_1" />
    </action>
    <group name="steer">
      <action name="left">
        <axis name="di_x_axis" type="lower" deadzone="0.0" saturation="1.0" />
      </action>
      <action name="right">
        <axis name="di_x_axis" type="upper" deadzone="0.0" saturation="1.0" />
      </action>
    </group>
    <action name="wipers">
      <axis name="di_button_13" />
    </action>
  </group>
  <group name="school">
    <action name="instructor_recap">
      <axis name="di_button_3" />
    </action>
  </group>
  <group name="menu">
    <group name="button">
      <action name="3">
        <axis name="di_button_2" />
      </action>
      <action name="4">
        <axis name="di_button_4" />
      </action>
      <action name="start">
        <axis name="di_button_1" />
      </action>
      <action name="select">
        <axis name="di_button_15" />
      </action>
      <group name="shoulder">
        <action name="left">
          <axis name="di_button_5" />
        </action>
        <action name="right">
          <axis name="di_button_10" />
        </action>
      </group>
    </group>
    <group name="navigate">
      <action name="back">
        <axis name="di_button_11" />
      </action>
      <action name="select">
        <axis name="di_button_13" />
      </action>
      <action name="cancel_keybinding">
        <axis name="di_button_14" />
      </action>
    </group>
    <group name="view">
      <action name="left">
        <axis name="di_x_axis" type="lower" deadzone="0.0" saturation="1.0" />
      </action>
      <action name="right">
        <axis name="di_x_axis" type="upper" deadzone="0.0" saturation="1.0" />
      </action>
    </group>
  </group>
  <group name="replay">
    <action name="exit">
      <axis name="di_button_11" />
    </action>
    <action name="forward">
      <axis name="di_x_axis" type="upper" deadzone="0.0" saturation="1.0" />
    </action>
    <action name="rewind">
      <axis name="di_x_axis" type="lower" deadzone="0.0" saturation="1.0" />
    </action>
    <action name="pause">
      <axis name="di_button_13" />
    </action>
    <group name="toggle">
      <action name="music">
        <axis name="di_button_6" />
      </action>
      <action name="ui">
        <axis name="di_button_12" />
      </action>
    </group>
    <group name="camera">
      <action name="previous">
        <axis name="di_button_5" />
      </action>
      <action name="next">
        <axis name="di_button_10" />
      </action>
    </group>
  </group>
  <group name="network">
    <group name="toggle">
      <action name="voice">
        <axis name="di_button_3" />
      </action>
    </group>
  </group>
</action_map>
Unzip and copy the xml file in the correct directory
new “flavor” actionmap with minimal settings, use load preset in game settings to restore this minimal settings:
create a xml file with Notepad++ named
simucube_osw_minimal.xml
with:
<?xml version="1.0" encoding="utf-8"?>
<action_map name="simucube_osw_minimal" device_name="simucube_osw" library="lib_direct_input">
  <axis_defaults>
    <axis name="di_x_axis">
    <action deadzone="0" name="driving.steer.left" />
    <action deadzone="0" name="driving.steer.right" />
    </axis>
  </axis_defaults>
  <group name="driving">
    <group name="steer">
      <action name="left">
       <axis name="di_x_axis" type="lower" />
      </action>
     <action name="right">
      <axis name="di_x_axis" type="upper" />
    </action>
  </group>
 </group>
</action_map>Unzip and copy the xml file in the correct directory
Fanatec Podium
DiRT 4 and DiRT Rally 2.0 MOD FOR FANATEC PODIUM DD1/DD2

Coming soon…
Tutorial Video
French tutorial video by Franconen – HowTo Activate FFB
French tutorial video by Franconen – HowTo Improve FFB
Windows Protected Your PC Warning Message (For Apps Not From Windows Store)
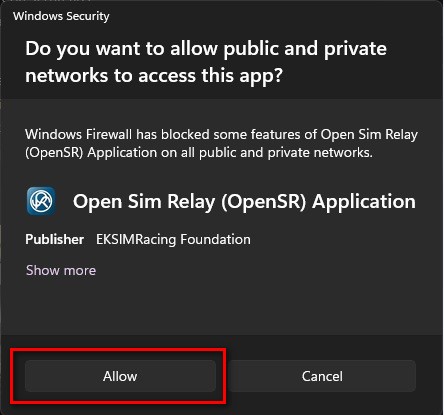
Windows 10 and greater display a warning message if the application is not from Windows Store, click “Run anyway” and “Allow” to install OpenSR and let the app communicate with other devices.
VIRTUALBOX Host Adapter Conflict
VIRTUALBOX Conflict: VirtualBox HOST / Ethernet adapter is catching/rerouting all inbound UDP stream and prevents OpenSR to communicate with VDASH-EMU. Disable the VIRTUALBOX Ethernet adapter on your Windows to be able to use the software.


How To Get Codemasters F1 20xx Dirt2 And Dirt3 Working With Latest Software
ATTENTION (common error):
Here we are talking about setup the game to send telemetry data by editing the setup file in ../DOCUMENTS/MY GAMES/ directory and NOT in the game directory.
More infos available in Plugins Pages
F1 25 PC Steam and XB/PS Console version (API v13)
(disable native support of SLI-PRO, Thrustmaster and Fanatec hardware)
The UDP Settings are now directly available in the game UDP settings
To configure F1 25, launch the game and in Telemetry settings:
– set Fanatec LED OFF
– set SLI-PRO LED OFF
– set UDP Telemetry to ON
– set the rate to 60Hz,
– do not activate Broadcast.
– if the IP is not set then put 127.0.0.1 which is your PC (localhost),
– format: 2025
Notes For XBOX/PlayStation PS5/PS4:
The “REMOTE Management” configuration is available in Plugins Pages
F1 24 PC Steam and XB/PS Console version (API v12)
(disable native support of SLI-PRO, Thrustmaster and Fanatec hardware)
The UDP Settings are now directly available in the game UDP settings
To configure F1 24, launch the game and in Telemetry settings:
– set Fanatec LED OFF
– set SLI-PRO LED OFF
– set UDP Telemetry to ON
– set the rate to 60Hz,
– do not activate Broadcast.
– if the IP is not set then put 127.0.0.1 which is your PC (localhost),
– format: 2024
Notes For XBOX/PlayStation PS5/PS4:
The “REMOTE Management” configuration is available in Plugins Pages
F1 23 PC Steam and XB/PS Console version (API v11)
(disable native support of SLI-PRO, Thrustmaster and Fanatec hardware)
The UDP Settings are now directly available in the game UDP settings
To configure F1 23, launch the game and in Telemetry settings:
– set Fanatec LED OFF
– set SLI-PRO LED OFF
– set UDP Telemetry to ON
– set the rate to 60Hz,
– do not activate Broadcast.
– if the IP is not set then put 127.0.0.1 which is your PC (localhost),
– format: 2023
Notes For XBOX/PlayStation PS5/PS4:
The “REMOTE Management” configuration is available in Plugins Pages
F1 22 PC Steam and XB/PS Console version (API v10)
(disable native support of SLI-PRO, G27 and Fanatec hardware)
The UDP Settings are now directly available in the game UDP settings
To configure F1 22, launch the game and in Telemetry settings:
– set Fanatec LED OFF
– set SLI-PRO LED OFF
– set UDP Telemetry to ON
– set the rate to 60Hz,
– do not activate Broadcast.
– if the IP is not set then put 127.0.0.1 which is your PC (localhost),
– format: 2022
Notes For XBOX/PlayStation PS5/PS4:
This “REMOTE Management” configuration includes:

– a game console connected to your LAN network
– a PC or laptop (also connected to your LAN) running OpenSR and the F1 22 Console bridge app
– USB dash display connected to your PC or Laptop
– or/and a VDASH-EMU running on Windows or Android Tablet
(VDASH-EMU is recommended so you can put the tablet under the TV to get a clear view of telemetry data during your game session on console)
follow the above instruction to activate telemetry in game but change the IP:
– Enter the IP address (192.168.x.x) of your PC running OpenSR
Check For Update to get the F1 22 Console Bridge app (installed automatically inside the OpenSR directory)
To start a session run the F1 22 Console Bridge on the PC after OpenSR
(find the app inside OpenSR application directory)
F1 2021 PC Steam and XB1/PS4 Console version (API v9)
(disable native support of SLI-PRO, G27 and Fanatec hardware)
The UDP Settings are now directly available in the game UDP settings
To configure F1 2021, launch the game and in Telemetry settings:
– set Fanatec LED OFF
– set SLI-PRO LED OFF
– set UDP Telemetry to ON
– set the rate to 60Hz,
– do not activate Broadcast.
– if the IP is not set then put 127.0.0.1 which is your PC (localhost),
– format: 2021
– set audience to: Restricted
Notes For XBOX/PS4:
This “REMOTE Management” configuration includes:

– a game console connected to your LAN network
– a PC or laptop (also connected to your LAN) running OpenSR and the F1 2021 Console bridge
– USB dash display connected to your PC or Laptop
– or/and a VDASH-EMU running on Windows or Android Tablet
(VDASH-EMU is recommended so you can put the tablet under the TV to get a clear view of telemetry data during your game session)
follow the above instruction to activate telemetry in game but change the IP:
– Enter the IP address (192.168.x.x) of your PC running OpenSR
Check For Update to get the F1 Console Bridge app (installed automatically inside the OpenSR directory)
To start a session run the F1 2021 Console Bridge on the PC after OpenSR
(find the app inside OpenSR application directory)
F1 2020 PC Steam and XB1/PS4 Console version (API v8)
(disable native support of SLI-PRO, G27 and Fanatec hardware)
The UDP Settings are now directly available in the game UDP settings
To configure F1 2020, simply launch the game and in Telemetry settings:

– set Fanatec LED OFF
– set SLI-PRO LED OFF
– set UDP Telemetry to ON
– set the rate to 60Hz,
– do not activate Broadcast.
– if the IP is not set then put 127.0.0.1 which is your PC (localhost),
– format: 2020
Notes For XBOX/PS4:
The IP address (192.168.x.x) is the IP of your PC running OpenSR and you can use F1 2017 Console Bridge with UDP Format: Legacy or OLD
F1 2019 PC Steam and XB1/PS4 Console version (API v7)
(disable native support of SLI-PRO, G27 and Fanatec hardware)
The UDP Settings are now directly available in the game UDP settings
To configure F1 2019, simply launch the game and in Telemetry settings
– set Fanatec LED OFF
– set SLI-PRO LED OFF
– set UDP Telemetry to ON
– set the rate to 60Hz,
– do not activate Broadcast.
– if the IP is not set then put 127.0.0.1 which is your PC (localhost),
– format: 2019
Notes For XBOX/PS4:
The IP address (192.168.x.x) is the IP of your PC running OpenSR and you can use F1 2017 Console Bridge with UDP Format: Legacy
DiRT Rally 2.0 (API v3)
Apply the change below to your hardware config xml file in
..\Documents\My Games\DiRT Rally 2.0\hardwaresettings\ directory

F1 2018 PC Steam and XB1/PS4 Console version (API v6)
(disable native support of SLI-PRO, G27 and Fanatec to let OpenSR manage them)
The UDP Settings are now directly available in the game UDP settings
To configure F1 2018, simply launch the game and in UDP settings
– set Fanatec LED OFF
– set SLI-PRO LED OFF
– set UDP Telemetry to ON
– set the rate to 60Hz,
– do not activate Broadcast.
– if the IP is not set then put 127.0.0.1 which is your PC (localhost),
– format: 2018

Notes For XBOX/PS4:
The IP address (192.168.x.x) is the IP of your PC running OpenSR and you can use F1 2017 Console Bridge with UDP Format: Legacy
F1 2017 PC Steam and XB1/PS4 Console version (API v5)
(disable native support of SLI-PRO, G27 and Fanatec to let OpenSR manage them)
The UDP Settings are now directly available in the game UDP settings
– to configure F1 2017, simply launch the game and in settings
– set Fanatec LED OFF
– set SLI-PRO LED OFF
– set UDP Telemetry to ON
– the rate to 60Hz,
– do not activate Broadcast.
– if the IP is not set then put 127.0.0.1 which your PC (localhost).
Notes For XBOX/PS4:
The IP (192.168.x.x) of your PC running OpenSR and the Console Bridge must be entered.

For Console XBOX and PS4 version of the game, insert the IP of the PC 192.168.xxx.xxx
(the PC where OpenSR and F1 2017 Console Bridge are running, see the Console Forum for more info)
DiRT 4 (API v3)
Apply the change below to your hardware config xml file in
..\Documents\My Games\DiRT 4\hardwaresettings\ directory

F1 2016 (API v4)
(disable native support of SLI-PRO, G27 and Fanatec to let OpenSR manage them)
Apply the change below to your hardware config xml file in
..\Documents\My Games\F1 2016\hardwaresettings\ directory,

DiRT Rally (API v3)
Apply the change below to your hardware config xml file in
..\Documents\My Games\Dirt Rally\hardwaresettings\ directory

F1 2015 (API v4)
(disable native support of SLI-PRO, G27 and Fanatec to let OpenSR manages them)
Apply the change below to your hardware config xml file in
..\Documents\My Games\F1 2015\hardwaresettings\ directory,
F1 2014 (API v3)
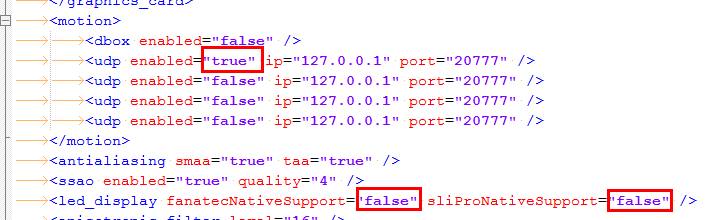
(disable native support of G27 and Fanatec to let OpenSR manages them)
Apply the change (red text) below to your hardware config xml file in
..\Documents\My Games\FormulaOne2014\hardwaresettings\ directory, sometime it’s necessary to add the line if doesn’t exists.
Find:
<motion enabled="true" extradata="0" delay="1" port="20777" ip="dbox"/>

<led_display nativeSupport="true"/>


and replace with:
<led_display nativeSupport="false" fanatecNativeSupport="false" />

<motion enabled="true" ip="127.0.0.1" port="20777" delay="1" extradata="3" />
F1 2013 (API v3)
(disable native support of G27 and Fanatec to let OpenSR manages them)
Apply the change (red text) below to your hardware config xml file in
..\Documents\My Games\FormulaOne2013\hardwaresettings\ directory, sometime it’s necessary to add the line if doesn’t exists.
Find:
<motion enabled="true" extradata="0" delay="1" port="20777" ip="dbox"/>

<led_display nativeSupport="true"/>


and replace with:
<led_display nativeSupport="false" fanatecNativeSupport="false" />

<motion enabled="true" ip="127.0.0.1" port="20777" delay="1" extradata="3" />
GRID 2 (API v3)
Apply the change below to your hardware config xml file in
..\Documents\My Games\GRID 2\hardwaresettings\ directory
Find:
<motion enabled="true" extradata="0" delay="1" port="20777" ip="dbox"/>


and replace with:
<motion enabled=”true” ip=”127.0.0.1″ port=”20777″ delay=”1″ extradata=”3″ />
F1 2012 (API v2)
(disable native support of G27 and Fanatec to let OpenSR manages them)
A:Apply the change (red text) below to your hardware config xml file in
..\Documents\My Games\FormulaOne2012\hardwaresettings\ directory, sometime it’s necessary to add the line if doesn’t exists.
Find:
<motion enabled="true" extradata="0" delay="1" port="20777" ip="dbox"/>

<led_display nativeSupport="true"/>


and replace with:
<led_display nativeSupport="false" fanatecNativeSupport="false" />

<motion enabled="true" ip="127.0.0.1" port="20777" delay="1" extradata="2" />
F1 2011 (API v1)
A:Apply the change (red text) below to your hardware config xml file in
..\Documents\My Games\FormulaOne2011\hardwaresettings directory
Find:
<motion enabled="true" extradata="0" delay="1" port="20777" ip="dbox"/>


and replace with:
<motion enabled="true" ip="127.0.0.1" port="20777" delay="1" extradata="1" />
F1 2010 (API v1)
Apply the change (red text) below to your hardware config xml file in
..\Documents\My Games\FormulaOne\hardwaresettings\ directory
Find:
<motion enabled="true" extradata="0" delay="1" port="20777" ip="dbox"/>


and replace with:
<motion enabled="true" ip="127.0.0.1" port="20777" delay="1" extradata="1" />
DiRT3 and DiRT2 (API v1)
Apply the change below to your hardware config xml file in
..\Documents\My Games\Dirt3\hardwaresettings\ directory
Find:
<motion enabled="true" extradata="0" delay="1" port="20777" ip="dbox"/>


and replace with:
<motion enabled="true" ip="127.0.0.1" port="20777" delay="1" extradata="1" />
.
How does the software cost?
The Transition to Free Access
You no longer need a license to use our software.
We are proud to announce that OpenSR is now available free of charge for everyone. OpenSR includes native support for VDASH-EMU on both Android and Windows, motion platform, sim racing hardware, etc. for free and it is the platform that will receive all future features, improvements, and ongoing development.
For all new installations and future-proofing your setup, we strongly recommend switching to OpenSR. It is the simplest and most up-to-date way to experience your sim racing devices.
A Community-Driven Project
OpenSR is a community-driven project. While the software is completely free to use, it is sustained by the generosity of our users. Donations are always welcome and directly support the development of new features and the maintenance of our technical infrastructure.
A Special Thank You to Our Legacy Users
To show our appreciation for those who supported our previous software, existing registered users can sign in to OpenSR using their original account to unlock additional benefits, including Pro Performance Mode (PPM).
Why Donate?
Since 2007, EKSIMRacing has operated as a non-profit foundation dedicated to promoting sim racing worldwide. While we believe in providing high-quality software for free, building and maintaining professional-grade tools requires significant resources.
Your contributions help us cover:
- Development & Time: The countless hours spent coding, debugging, and refining features.
- Infrastructure: The costs of website maintenance, domain registration, and secure web hosting.
- Hardware Testing: To ensure our software works perfectly for you, we must invest in the hardware we support—including steering wheels, pedal sets, button boxes, and various electronic components.
By making a contribution, you aren’t just buying a product; you are helping the EKSIMRacing project remain active and ensuring that the sim racing community continues to have access to great software.
Thank you for your support.
Select Donation Amount:
($5 or more to include software support)
(5€ or more to include software support)