

Frequently Asked Questions and Answers
To search the Frequently Asked Questions (FAQs), enter your search terms or questions in the box below
0 The Most Common
Register your USB Device or your Emulator
Register your USB Device or VDASH-EMU Emulator
WATCH THIS VIDEO FIRST
To lean how to download, install and register
your sim racing device (Fanatec, Thrustmaster, Leo Bodnar devices, SIM Display devices,…)
or our digital dash (VDASH-EMU) for Windows or Android
Video Ledsmaster download and installation
Thank you for your interest in EKSIMRacing foundation software
THE BASIC STEPS
IN SHORT
It’s very easy to use the software, watch the video above. Connect your device or run the VDASH-EMU, Download, install Ledsmaster server and then click the REGISTER button in Registration Information window to register your software license for your steering wheel, USB display device or VDASH-EMU.
FULL STEPS
Watch the video above and read the basic steps below to get started with your sim racing hardware.
The video above show up the steps to register and is applicable to all sim racing devices including steering wheel (Fanatec, Thrustmaster,…), SIM Display and Leo Bodnar displays and other supported devices.
During the installation the Windows firewall will prompt you to grant access to our software. This is needed to communicate with our licensing server to get your software license automatically.
1 Connect your USB device

– check if your sim racing hardware is recognized by Windows
or If you want to use the digital dash, click to download and run VDASH-EMU
2

Click to download and install the latest Ledsmaster server
3
CLICK TO READ HOW TO CONFIGURE YOUR GAME
– configure your game to send telemetry data. Ledsmaster needs to receive the car telemetry from the game to work properly. Also, you need to disable the native support of LED in the game options (if applicable).

More info related to each game supported can be found in the Plugins Pages
4 Before Registration

– run Ledsmaster server, click NO on first launch to register your license

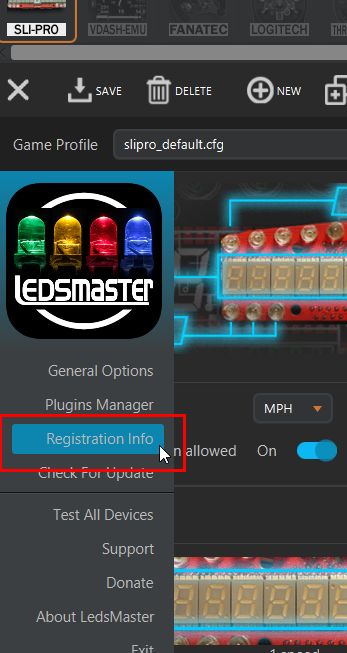
5
When you are ready to register, select the Registration Information menu

The Registration Information dialog prompt you to register your software license when you launch Ledsmaster without a license, click “REGISTER” button to make your contribution to support the projects of our nonprofit foundation, then sign up your support account.
 Donation issue from Japan, read the FAQ
Your software license and your support account is validated within 24h and a notification* is sent to you automatically (login your support account to read your pending messages ),
*IMPORTANT: the licensing system will not sent the notification when your license is ready if you don’t have a support account. Do not forget to sign up your support account after making your donation to receive the information to get started quickly with the software.
6 After Registration Completed
– launch Ledsmaster server. This time click YES to download, install and validate your software license automatically from our licensing server,

– run your favorite game
You basically do not need anything else to get started
It is recommended to follow the basic steps above. Use the default setup and enjoy your sim racing rig with your favorite game (Ledsmaster supports more than 60 games) and later start to customize your setup to suit your needs.
Configure AMS2 to “Use Shared memory”?
Each time you upgrade Project CARS don’t forget to check the status of Shared memory in System Settings.
Automobilista 2
To turn ON telemetry go to SYSTEM > Use Shared Memory > Project CARS 2
Check the plugin page to get the latest info, HERE.

Can I use the software commercially or in any business context?
[EN] Can I use the software commercially or in any business context?
The license is for *PERSONAL USE ONLY*
if you run Ledsmaster or SLIMax Manager or MotionMax Manager (all versions) in ANY BUSINESS CONTEXT then a PRO Annual Subscription or a PRO device license is needed to be in conformity of our Terms And Conditions. Any violation of our terms of use may result in the termination without notice of all previously registered licenses. (read the FAQ to get all benefit of PRO Registration).
[FR]Puis-je utiliser le logiciel commercialement ou dans n’importe quel contexte commercial?
La licence est pour * UTILISATION PERSONNELLE UNIQUEMENT
si vous exécutez Ledsmaster ou SLIMax Manager ou MotionMax Manager (toutes les versions) dans TOUT CONTEXTE COMMERCIAL ou PROFESSIONNEL vous devez alors souscrire à un abonnement annuel PRO ou une licence individuelle PRO pour être conforme à nos Conditions d’utilisation. Toutes infractions à nos conditions d’utilisation peuvent entraîner la résiliation sans préavis de toutes les licences préalablement enregistrées. (lisez la FAQ pour obtenir tous les avantages de l’enregistrement PRO).
[IT] Posso usare il software per scopi commerciali o in qualsiasi contesto commerciale?
La licenza è valida per * SOLO PER USO PERSONALE *
se si esegue Ledsmaster o SLIMax Manager o MotionMax Manager (tutte le versioni) in QUALSIASI CONTESTO COMMERCIALE o PROFESSIONNAL, è necessario un abbonamento PRO o licenza PRO per rispettare le nostre condizioni generali. Qualsiasi violazione dei nostri termini d’uso può comportare la risoluzione senza preavviso di tutte le licenze precedentemente registrate. (leggi le FAQ per ottenere tutti i vantaggi della registrazione PRO).
Devices Supported
Check the new updated Ledsmaster F.A.Q., here
Getting Started With VDASH-EMU (virtual display emulator)
VDASH-EMU User guide Tips, Manual, Getting Started instructions, Tutorials are here.
Getting Started with VDASH-EMU
Configure simulation and game to send telemetry
 Configure your game or simulation
Each game or simulation need to be configured to send telemetry data and to get it working with USB Shiftlights Device or to disable its native support of Fanatec or Logitech led and digits to let the SLIMax Manager handle them.
all updates information are available in Plugins Pages Forum
The plugins information page is a good source to know if your game is supported or not, check this HERE
Almost All Plugins are usually included in the installer of Ledsmaster. Select Check for update to get the latest version of plugins and keep your installation up to date.
Here is the list of plugins available at this date (check the plugins page for more info):
Official:
Read the FAQ: configure your game
Studio 397
Le Mans Ultimate,
rFactor Pro**,
rFactor 2,
rFactor,
rFactor Steam,
iRacing
iRacing,
Kunos Simulazioni
Assetto Corsa Pro**,
Assetto Corsa Rally,
Assetto Corsa EVO,
Assetto Corsa Competizione,
Assetto Corsa,
Assetto Corsa XBox/PlayStation Console Bridge,
KW Studios (Sector3)
RaceRoom Racing Experience,
All EA – CodeMasters games
WRC
EA SPORTS WRC 2023,
F1 Games
Codemasters / EA F1 25,
Codemasters / EA F1 25 XBox/PlayStation Console Bridge,
Codemasters / EA F1 24,
Codemasters / EA F1 24 XBox/PlayStation Console Bridge,
Codemasters / EA F1 23,
Codemasters / EA F1 23 XBox/PlayStation Console Bridge,
Codemasters / EA F1 22,
Codemasters / EA F1 22 XBox/PlayStation Console Bridge,
EA Grid Legends,
All CodeMasters games
Codemasters F1 2021,
Codemasters F1 2021 XBox/PlayStation Console Bridge,
Codemasters F1 2020,
Codemasters F1 2019,
Codemasters DiRT Rally 2.0,
Codemasters F1 2018,
Codemasters F1 2017,
Codemasters F1 2017 XBox/PlayStation Console Bridge,
Codemasters DiRT 4,
Codemasters DiRT Rally,
Codemasters F1 2016,
Codemasters F1 2016 XBox/PlayStation Console Bridge,
Codemasters F1 2015,
Codemasters F1 2014,
Codemasters F1 2013,
Codemasters F1 2012,
Codemasters F1 2011,
Codemasters F1 2010,
Codemasters GRID Autosport,
Codemasters GRID2,
Codemasters DiRT3,
Codemasters DiRT2,
Codemasters GRID,
ALL REIZA Studios
Automobilista 2,
Automobilista
Formula Truck (all versions),
Game Stock Car,
SMS Games
Project CARS 3,
Project CARS 2,
Project CARS 2 XBox/PlayStation Console Bridge,
Project CARS,
Project CARS XBox/PlayStation Console Bridge,
All rFactor Clones
ARCA Sim Racing,
Simraceway,
Superleague Formula,
Turismo Carretera,
Simbin Studios
Simbin GTR2,
Simbin Steam GTR2,
Simbin Steam Race07 + all packs,
Simbin GTR EVO,
Simbin RaceON,
Simbin RaceInjection,
Simbin STCC I / II,
Simbin WTCC,
Simbin Injection,
Simbin GT Power,
Simbin Retro Expansion,
Simbin DTM Experience,
Others
Forza Motorsport 2023 (beta),
WRC Generations,
Forza Horizon 4 (beta),
Forza Horizon 5 (beta),
Forza Motorsport 7 (beta),
BeamNG Drive,
KartKraft (Black Delta),
PiBoSo Kart Racing Pro,
PiBoSo MX Bikes,
PiBoSo GP Bikes,
PiBoSo World Racing Series,
GRally,Papyrus NASCAR 2003, (outdated)
Live For Speed,netKar PRO,(outdated)
Oldies
SMS SHIFT2,
Simbin GTR
Grand Prix Legends,
GT Legends,
Richard Burns Rally,
X Motor Racing,
SCS Software Truck Sim:
Euro Truck Simulation 2,
American Truck Simulator
Fligth-Sim
XPlane 10*,
XPlane 11*,
DCS World (Digital Combat Simulator),
Flight Simulator X (FSX)*,
Flight Simulator 2020 (FS2020)*,
Other
NoLimits Roller Coaster Simulation 2*
*Available on demand (not free)
**PRO custom plugins available to PRO subscribers only, contact us


OTHERS
|
|
Check the plugins pages for more info… |


How to change speed unit MPH to KMH?
To change the speed unit from US/Imperial to Metric or MPH to KMH (KPH):
Change speed unit to KPH ( Km/h, METRIC) or MPH in GENERAL > Unit section, here is an example for the SLI-PRO device:

Configure Project CARS to “Use Shared memory”?
Each time you upgrade Project CARS don’t forget to check the status of Shared memory setting.
Project CARS 3
To turn ON telemetry go to SYSTEM > Use Shared Memory > Project CARS 2
Check the plugin page to get the latest info, HERE.

disable RPM/Gear feedback in Settings > Wheel & FFB

Project CARS 2
To turn ON telemetry go to SYSTEM > Use Shared Memory > Project CARS 2
Check the plugin page to get the latest info, HERE.

Also, if you have a Fanatec wheel disable RPM/Gear feedback in OPTIONS > CONTROLS > Configuration see the picture below:

Project CARS 1
To turn ON telemetry go to Gameplay > Use Shared Memory > Yes
Check the plugin page to get the latest info, HERE.

Also, if you have a Fanatec (CSW or others) wheel disable RPM/Gear feedback in Controls Setup see the picture below:

Related FAQ:
Configure your game or simulation to send telemetry data
For more info visit: https://www.eksimracing.org
How to get the display or emulator serial number?
GET USB DEVICE DISPLAY OR EMULATOR SERIAL NUMBER AND REGISTER:
To get the serial number of your USB Device Display, steering wheel or Android/Windows Emulator,
Make sure your hardware is installed and recognized by Windows, launch Ledsmaster (download the latest version) and the ‘Registration Information‘ window should show up the first time you launch the app, if it didn’t then select the menu “Registration Info…”
The Registration Info window will open automatically if your are not yet registered and/or your license is not found.

Select the device or emulator line and right-click to copy the type with the serial number.
Notes: the ‘– :‘ prefix before the serial number indicates that the license is not yet installed.
You have now successfully copied your device/emu serial number.
Click the REGISTER button to register and create your support account.

How To Use Your Codemasters DiRT Rally 2.0, DiRT4 With Simucube FW or MMOS OSW?
UPDATED by Zappadoc 2019-02-26

How to get ffb with your Codemasters games DiRT Rally 2.0 and DiRT 4 using your simucube osw direct drive?
IMPORTANT: don’t trust guys around which give you the wrong information. Double check your device settings and compare with the line below, This is the correct way to declare your DD to be able to choose between Direct Drive driver and DR2.0 FFB settings, With the correct parameters this will greatly improve the FFB in Dirt Rally 2.0 and please add the link to this page which is updated regularly and do not just copy/past these info. Thanks.

The current DR2.0 FFB will not give you as much surface information as the DR1.0 but you can play with params to improve it. Beware all grayed settings are in fact perfectly usable. After a lot of game and simucube FFB tweaks, the feeling should be closer to DR1 but more attenuated unfortunately. We are all waiting for an FFB bug fix from Codemasters.

MMOS
DiRT 4 and DiRT Rally 2.0 MOD FOR SIMUCUBE MMOS MANAGEMENT
For OSW Simucube users, you have to enter the description of the device manually and create the corresponding generic actionmap file. I posted the instructions in Codemasters forum and here.
ATTENTION: THIS MOD DOESN’T CONTAIN ANY FFB PARAMETERS,
This allows the game to recognize the mmos device as a DD steering wheel only.
in game directory
input directory
device_defines.xml
after <!– comments –>
add this line:
<device id="{0FFBF055-0000-0000-0000-504944564944}" name="simucube_osw_mmos" priority="100" type="wheel" official="false" />
IMPORTANT: don’t trust guys around which give you the wrong information. Double check your device settings and compare with the line above, This is the correct way to declare your DD to be able to choose between Direct Drive driver and DR2.0 FFB settings, With the correct parameters this will greatly improve the FFB in Dirt Rally 2.0 and please add the link to this page which is updated regularly and do not just copy/past these info. Thanks.
in actionmap directory
create a xml file with Notepad++ named
simucube_osw_mmos.xml
with:
the xml file below is in attachment
<?xml version="1.0" encoding="utf-8"?>
<action_map name="simucube_osw_mmos" device_name="simucube_osw_mmos" library="lib_direct_input">
  <group name="driving">
    <action name="change_view">
      <axis name="di_button_6" />
    </action>
    <group name="gear">
      <group name="sequential">
        <action name="up">
          <axis name="di_button_10" />
        </action>
        <action name="down">
          <axis name="di_button_5" />
        </action>
      </group>
    </group>
    <action name="handbrake">
      <axis name="di_button_8" />
    </action>
    <action name="headlights">
      <axis name="di_button_11" />
    </action>
    <group name="look">
      <action name="back">
        <axis name="di_button_7" />
      </action>
    </group>
    <action name="pause">
      <axis name="di_button_14" />
    </action>
    <action name="reset_vehicle">
      <axis name="di_button_9" />
    </action>
    <action name="roadside_repair">
      <axis name="di_button_1" />
    </action>
    <group name="steer">
      <action name="left">
        <axis name="di_x_axis" type="lower" deadzone="0.0" saturation="1.0" />
      </action>
      <action name="right">
        <axis name="di_x_axis" type="upper" deadzone="0.0" saturation="1.0" />
      </action>
    </group>
    <action name="wipers">
      <axis name="di_button_13" />
    </action>
  </group>
  <group name="school">
    <action name="instructor_recap">
      <axis name="di_button_3" />
    </action>
  </group>
  <group name="menu">
    <group name="button">
      <action name="3">
        <axis name="di_button_2" />
      </action>
      <action name="4">
        <axis name="di_button_4" />
      </action>
      <action name="start">
        <axis name="di_button_1" />
      </action>
      <action name="select">
        <axis name="di_button_15" />
      </action>
      <group name="shoulder">
        <action name="left">
          <axis name="di_button_5" />
        </action>
        <action name="right">
          <axis name="di_button_10" />
        </action>
      </group>
    </group>
    <group name="navigate">
      <action name="back">
        <axis name="di_button_11" />
      </action>
      <action name="select">
        <axis name="di_button_13" />
      </action>
      <action name="cancel_keybinding">
        <axis name="di_button_14" />
      </action>
    </group>
    <group name="view">
      <action name="left">
        <axis name="di_x_axis" type="lower" deadzone="0.0" saturation="1.0" />
      </action>
      <action name="right">
        <axis name="di_x_axis" type="upper" deadzone="0.0" saturation="1.0" />
      </action>
    </group>
  </group>
  <group name="replay">
    <action name="exit">
      <axis name="di_button_11" />
    </action>
    <action name="forward">
      <axis name="di_x_axis" type="upper" deadzone="0.0" saturation="1.0" />
    </action>
    <action name="rewind">
      <axis name="di_x_axis" type="lower" deadzone="0.0" saturation="1.0" />
    </action>
    <action name="pause">
      <axis name="di_button_13" />
    </action>
    <group name="toggle">
      <action name="music">
        <axis name="di_button_6" />
      </action>
      <action name="ui">
        <axis name="di_button_12" />
      </action>
    </group>
    <group name="camera">
      <action name="previous">
        <axis name="di_button_5" />
      </action>
      <action name="next">
        <axis name="di_button_10" />
      </action>
    </group>
  </group>
  <group name="network">
    <group name="toggle">
      <action name="voice">
        <axis name="di_button_3" />
      </action>
    </group>
  </group>
</action_map>
DOWNLOAD simucube_osw_mmos xml
Unzip and copy the xml file in the correct directory
new “flavor” actionmap with minimal settings, use load preset in game settings to restore this minimal settings:
create a xml file with Notepad++ named
simucube_osw_mmos_minimal.xml
with:
<?xml version="1.0" encoding="utf-8"?>
<action_map name="simucube_osw_mmos_minimal" device_name="simucube_osw_mmos" library="lib_direct_input">
  <axis_defaults>
    <axis name="di_x_axis">
    <action deadzone="0" name="driving.steer.left" />
    <action deadzone="0" name="driving.steer.right" />
    </axis>
  </axis_defaults>
  <group name="driving">
    <group name="steer">
      <action name="left">
       <axis name="di_x_axis" type="lower" />
      </action>
     <action name="right">
      <axis name="di_x_axis" type="upper" />
    </action>
  </group>
 </group>
</action_map>
DOWNLOAD simucube_osw_mmos_minimal
Unzip and copy the xml file in the correct directory
Simucube FW
DiRT 4 and DiRT Rally 2.0 MOD FOR NATIVE SIMUCUBE FW MANAGEMENT
![]()
For OSW Simucube users, you have to enter the description of the device manually and create the corresponding generic actionmap file. I posted the instructions in Codemasters forum and here.
ATTENTION: THIS MOD DOESN’T CONTAIN ANY FFB PARAMETERS,
This allows the game to recognize the mmos device as a DD steering wheel only.
in game directory
input directory
device_defines.xml
after <!– comments –>
add this line:
<device id="{0D5A16D0-0000-0000-0000-504944564944}" name="simucube_osw" priority="100" type="wheel" official="false" />IMPORTANT: don’t trust guys around which give you the wrong information. Double check your device settings and compare with the line above, This is the correct way to declare your DD to be able to choose between Direct Drive driver and DR2.0 FFB settings, With the correct parameters this will greatly improve the FFB in Dirt Rally 2.0 and please add the link to this page which is updated regularly and do not just copy/past these info. Thanks.
in actionmap directory
create a xml file with Notepad++ named
simucube_osw.xml
with:
the xml file below is in attachment
<?xml version="1.0" encoding="utf-8"?>
<action_map name="simucube_osw" device_name="simucube_osw" library="lib_direct_input">
  <group name="driving">
    <action name="change_view">
      <axis name="di_button_6" />
    </action>
    <group name="gear">
      <group name="sequential">
        <action name="up">
          <axis name="di_button_10" />
        </action>
        <action name="down">
          <axis name="di_button_5" />
        </action>
      </group>
    </group>
    <action name="handbrake">
      <axis name="di_button_8" />
    </action>
    <action name="headlights">
      <axis name="di_button_11" />
    </action>
    <group name="look">
      <action name="back">
        <axis name="di_button_7" />
      </action>
    </group>
    <action name="pause">
      <axis name="di_button_14" />
    </action>
    <action name="reset_vehicle">
      <axis name="di_button_9" />
    </action>
    <action name="roadside_repair">
      <axis name="di_button_1" />
    </action>
    <group name="steer">
      <action name="left">
        <axis name="di_x_axis" type="lower" deadzone="0.0" saturation="1.0" />
      </action>
      <action name="right">
        <axis name="di_x_axis" type="upper" deadzone="0.0" saturation="1.0" />
      </action>
    </group>
    <action name="wipers">
      <axis name="di_button_13" />
    </action>
  </group>
  <group name="school">
    <action name="instructor_recap">
      <axis name="di_button_3" />
    </action>
  </group>
  <group name="menu">
    <group name="button">
      <action name="3">
        <axis name="di_button_2" />
      </action>
      <action name="4">
        <axis name="di_button_4" />
      </action>
      <action name="start">
        <axis name="di_button_1" />
      </action>
      <action name="select">
        <axis name="di_button_15" />
      </action>
      <group name="shoulder">
        <action name="left">
          <axis name="di_button_5" />
        </action>
        <action name="right">
          <axis name="di_button_10" />
        </action>
      </group>
    </group>
    <group name="navigate">
      <action name="back">
        <axis name="di_button_11" />
      </action>
      <action name="select">
        <axis name="di_button_13" />
      </action>
      <action name="cancel_keybinding">
        <axis name="di_button_14" />
      </action>
    </group>
    <group name="view">
      <action name="left">
        <axis name="di_x_axis" type="lower" deadzone="0.0" saturation="1.0" />
      </action>
      <action name="right">
        <axis name="di_x_axis" type="upper" deadzone="0.0" saturation="1.0" />
      </action>
    </group>
  </group>
  <group name="replay">
    <action name="exit">
      <axis name="di_button_11" />
    </action>
    <action name="forward">
      <axis name="di_x_axis" type="upper" deadzone="0.0" saturation="1.0" />
    </action>
    <action name="rewind">
      <axis name="di_x_axis" type="lower" deadzone="0.0" saturation="1.0" />
    </action>
    <action name="pause">
      <axis name="di_button_13" />
    </action>
    <group name="toggle">
      <action name="music">
        <axis name="di_button_6" />
      </action>
      <action name="ui">
        <axis name="di_button_12" />
      </action>
    </group>
    <group name="camera">
      <action name="previous">
        <axis name="di_button_5" />
      </action>
      <action name="next">
        <axis name="di_button_10" />
      </action>
    </group>
  </group>
  <group name="network">
    <group name="toggle">
      <action name="voice">
        <axis name="di_button_3" />
      </action>
    </group>
  </group>
</action_map>
Unzip and copy the xml file in the correct directory
new “flavor” actionmap with minimal settings, use load preset in game settings to restore this minimal settings:
create a xml file with Notepad++ named
simucube_osw_minimal.xml
with:
<?xml version="1.0" encoding="utf-8"?>
<action_map name="simucube_osw_minimal" device_name="simucube_osw" library="lib_direct_input">
  <axis_defaults>
    <axis name="di_x_axis">
    <action deadzone="0" name="driving.steer.left" />
    <action deadzone="0" name="driving.steer.right" />
    </axis>
  </axis_defaults>
  <group name="driving">
    <group name="steer">
      <action name="left">
       <axis name="di_x_axis" type="lower" />
      </action>
     <action name="right">
      <axis name="di_x_axis" type="upper" />
    </action>
  </group>
 </group>
</action_map>Unzip and copy the xml file in the correct directory
Fanatec Podium
DiRT 4 and DiRT Rally 2.0 MOD FOR FANATEC PODIUM DD1/DD2
Coming soon…
Tutorial Video
French tutorial video by Franconen – HowTo Activate FFB
French tutorial video by Franconen – HowTo Improve FFB
How to register additional license ( purchase additional license )?
REGISTER (purchase) ADDITIONAL LICENSE:

Register ADDITIONAL license is the same process as registering your first license. You need to use Ledsmaster and make a donation in USD to get your license.
EKSIMRacing Foundation is a nonprofit organization and ask you to take part to the project. To get your license consider making a simple donation. Thank you for your support.
Make your donation only, DO NOT CREATE A NEW SUPPORT ACCOUNT IF YOU ALREADY OWN ONE, double account is NOT allowed.
Run Ledsmaster
> Select Registration Info menu if the windows is not visible
> Select the device or emulator in the list
> And click the REGISTER button
> and make your donation
Check Your Account Profile (you need to have a support account):
if EKSRIMRacing $ credit is available, a BLUE button will be visible on your support account Profile.
Click the link below to be redirected to your support account profile (copy/paste your EMU SERIAL NUMBER to avoid any error):
Notes:
DO NOT CREATE A NEW SUPPORT ACCOUNT IF YOU ALREADY OWN ONE, just make your donation.
Hardware, Devices, EMU Supported

The current devices supported by Ledsmaster
(updated 2024-03) Ledsmaster manages all devices simultaneously. Get more info on Ledsmaster


VoCore USB Screen 4″, 4.3″, 5″, 6.8″ and Round


STREAM DECK MK2 and XL v1/v2 with VDASH-EMU (Windows).
Leo Bodnar Shift-Lights Interface (SLI)

USB Shift lights Interface ( SLI-F1, SLI-PRO and SLI-M) and game controllers from Leo Bodnar,
Fanatec Conversion Kit

– Leo Bodnar Fanatec Conversion Kit is supported
(This is a proprietary implementation and NOT an emulation of Fanatec driver and can be used WITHOUT FANATEC Driver)
– Darknao Conversion Kit based on Teensy LC board is supported
(this is an emulation of Fanatec Driver and Fanatec driver must be installed)
– latest Sim Racing Machines (SRM) Conversion Kit v5 is NOT YET supported due to a change of their firmware/board
(this is a proprietary implementation and do not require the Fanatec driver).
– oldest Sim Racing Machines (SRM) Conversion Kit based on Leo Bodnar board is supported.
(This is a proprietary implementation and NOT an emulation of Fanatec driver and can be used WITHOUT FANATEC Driver)
Fanatec Steering Wheel and Pedals Set
Almost all Fanatec rim* (including the latest Fomula V2.x steering wheel)

*Ledsmaster have been tested with latest Fanatec driver and firmware and compiled with latest Fanatec SDK v4.05+
The software manages all Fanatec hardware supported by the version 4.05 of the official Fanatec SDK.
Logitech

G25/G27/G29/G920/G923/G PRO Racing DD
Thrustmaster TS-PC Racer Ferrari 488 Challenge Edition

(All Other Thrustmaster Wheel Base buttons and encoders as generic device only)
Steelseries

Steelseries SRW-S1 steering wheel and also, support any HID Compliant hardware including, any buttons-box like the famous Derek Speare Designs (DSD) devices, any buttons and encoders controllers, joystick, gamepad, shifter, etc.
VDASH-EMU Sim Racing Digital Dash
VDASH-EMU sim racing digital dash (usb device firmware emulator of real racing dash and real button-box) From EKSIMRacing. VDASH-EMU For Windows includes the native support of VoCore screens. Check the VDASH-EMU page for more info.
SimDisplay Sim Racing Devices

SIM RACE LCD, SIM RACE GT, SIM RACE F1, SIM RACE Deluxe or SIM RACE PRO USB Shift lights Display devices from SIM Display,
Led of my Logitech steering wheel not working, why?
Your Logitech G29 or G923 or PRO RACING WHEEL rev-led (shiftlights) is not working properly on Windows 10 or Windows 11
Unfortunately there’s a significant issue with G HUB driver on Windows 10/11 which prevent to get access to the rev led (shift-lights) features from SLIMax Manager Pro or from game apps. Sometime this is working after uninstalling G HUB or just quitting G Hub but most of the time it doesn’t work. however, everything is working as expected on Windows 7 using G HUB for Windows 7.
G27 use its own driver and not G HUB so it works.
To get your rev-led ready for SLIMax Manager Pro do not install G Hub but “Logitech Gaming software” (LGS). The steering wheel driver is correctly installed even if LGS indicates no usb device detected after installation (it’s safe to uncheck run at startup in LGS settings and exit LGS).
Follow these links below to download the corresponding version:
Windows 10/11 64-bit
https://download01.logi.com/web/ftp/pub/techsupport/gaming/LGS_9.04.49_x64_Logitech.exe

Windows 8/7 64-bit
https://download01.logi.com/web/ftp/pub/techsupport/gaming/LGS_9.02.74_x64_Logitech.exe

Logitech Gaming Software Download link:
https://support.logi.com/hc/en-us/articles/360025298053
Windows Protected Your PC Warning Message (For Apps Not From Windows Store)
Windows 10 and greater display a warning message if the application is not from Windows Store, click “Run anyway” and “Allow” to install Ledsmaster and let the app communicate with other devices.


VIRTUALBOX Host Adapter Conflict
VIRTUALBOX Conflict: VirtualBox HOST / Ethernet adapter is catching/rerouting all inbound UDP stream and prevents Ledsmaster to communicate with VDASH-EMU. Disable the VIRTUALBOX Ethernet adapter on your Windows to be able to use the software.


How To Renew My Fanatec License After The Update?
Since version 0.9.0.5k the licensing system for Fanatec users has been adjusted. If your Ledsmaster license was previously bonded to your Fanatec wheel base, you will need to update it accordingly.
First, Check For Update to get the latest version of Ledsmaster and register the new license format of your Fanatec device.

All registered Fanatec users can simply log in to their account, copy their new license number, and apply the update free of charge if you acquired your license by making a minimum contribution to our nonprofit foundation. For others, please follow the normal registration process to make your donation.
Old Number Format:
…..-….-….-…AG
New Number Format:
XXXXXXXXXXXXXXXXXXXXXXXXXXXXXXXXXXXAG
We sincerely apologize for any inconvenience this may cause and appreciate your understanding as we continue to improve Ledsmaster for the best possible experience.
Thank you for your support!
Free Limited Mode Not Found
The “Free Limited” mode has been removed following user feedback. Many users found the nag screens frustrating and expressed a preference to support our non-profit foundation’s projects with a small contribution, rather than use a limited demo. Registration is now required to use the software. Thank you all for your continued support!
How To Get Codemasters F1 20xx Dirt2 And Dirt3 Working With Latest Software
ATTENTION (common error):
Here we are talking about setup the game to send telemetry data by editing the setup file in ../DOCUMENTS/MY GAMES/ directory and NOT in the game directory.
More infos available in Plugins Pages
F1 25 PC Steam and XB/PS Console version (API v13)
(disable native support of SLI-PRO, Thrustmaster and Fanatec hardware)
The UDP Settings are now directly available in the game UDP settings
To configure F1 25, launch the game and in Telemetry settings:
– set Fanatec LED OFF
– set SLI-PRO LED OFF
– set UDP Telemetry to ON
– set the rate to 60Hz,
– do not activate Broadcast.
– if the IP is not set then put 127.0.0.1 which is your PC (localhost),
– format: 2025
Notes For XBOX/PlayStation PS5/PS4:
The “REMOTE Management” configuration is available in Plugins Pages
F1 24 PC Steam and XB/PS Console version (API v12)
(disable native support of SLI-PRO, Thrustmaster and Fanatec hardware)
The UDP Settings are now directly available in the game UDP settings
To configure F1 24, launch the game and in Telemetry settings:
– set Fanatec LED OFF
– set SLI-PRO LED OFF
– set UDP Telemetry to ON
– set the rate to 60Hz,
– do not activate Broadcast.
– if the IP is not set then put 127.0.0.1 which is your PC (localhost),
– format: 2024
Notes For XBOX/PlayStation PS5/PS4:
The “REMOTE Management” configuration is available in Plugins Pages
F1 23 PC Steam and XB/PS Console version (API v11)
(disable native support of SLI-PRO, Thrustmaster and Fanatec hardware)
The UDP Settings are now directly available in the game UDP settings
To configure F1 23, launch the game and in Telemetry settings:
– set Fanatec LED OFF
– set SLI-PRO LED OFF
– set UDP Telemetry to ON
– set the rate to 60Hz,
– do not activate Broadcast.
– if the IP is not set then put 127.0.0.1 which is your PC (localhost),
– format: 2023
Notes For XBOX/PlayStation PS5/PS4:
The “REMOTE Management” configuration is available in Plugins Pages
F1 22 PC Steam and XB/PS Console version (API v10)
(disable native support of SLI-PRO, G27 and Fanatec hardware)
The UDP Settings are now directly available in the game UDP settings
To configure F1 22, launch the game and in Telemetry settings:
– set Fanatec LED OFF
– set SLI-PRO LED OFF
– set UDP Telemetry to ON
– set the rate to 60Hz,
– do not activate Broadcast.
– if the IP is not set then put 127.0.0.1 which is your PC (localhost),
– format: 2022
Notes For XBOX/PlayStation PS5/PS4:
This “REMOTE Management” configuration includes:

– a game console connected to your LAN network
– a PC or laptop (also connected to your LAN) running SLIMax Manager Pro and the F1 22 Console bridge app
– USB dash display connected to your PC or Laptop
– or/and a VDASH-EMU running on Windows or Android Tablet
(VDASH-EMU is recommended so you can put the tablet under the TV to get a clear view of telemetry data during your game session on console)
follow the above instruction to activate telemetry in game but change the IP:
– Enter the IP address (192.168.x.x) of your PC running SLIMax Manager Pro
Check For Update to get the F1 22 Console Bridge app (installed automatically inside the SLIMax Manager Pro directory)
To start a session run the F1 22 Console Bridge on the PC after SLIMax Manager Pro
(find the app inside SLIMax Manager Pro application directory)
F1 2021 PC Steam and XB1/PS4 Console version (API v9)
(disable native support of SLI-PRO, G27 and Fanatec hardware)
The UDP Settings are now directly available in the game UDP settings
To configure F1 2021, launch the game and in Telemetry settings:
– set Fanatec LED OFF
– set SLI-PRO LED OFF
– set UDP Telemetry to ON
– set the rate to 60Hz,
– do not activate Broadcast.
– if the IP is not set then put 127.0.0.1 which is your PC (localhost),
– format: 2021
– set audience to: Restricted
Notes For XBOX/PS4:
This “REMOTE Management” configuration includes:

– a game console connected to your LAN network
– a PC or laptop (also connected to your LAN) running SLIMax Manager Pro and the F1 2021 Console bridge
– USB dash display connected to your PC or Laptop
– or/and a VDASH-EMU running on Windows or Android Tablet
(VDASH-EMU is recommended so you can put the tablet under the TV to get a clear view of telemetry data during your game session)
follow the above instruction to activate telemetry in game but change the IP:
– Enter the IP address (192.168.x.x) of your PC running SLIMax Manager Pro
Check For Update to get the F1 Console Bridge app (installed automatically inside the SLIMax Manager Pro directory)
To start a session run the F1 2021 Console Bridge on the PC after SLIMax Manager Pro
(find the app inside SLIMax Manager Pro application directory)
F1 2020 PC Steam and XB1/PS4 Console version (API v8)
(disable native support of SLI-PRO, G27 and Fanatec hardware)
The UDP Settings are now directly available in the game UDP settings
To configure F1 2020, simply launch the game and in Telemetry settings:

– set Fanatec LED OFF
– set SLI-PRO LED OFF
– set UDP Telemetry to ON
– set the rate to 60Hz,
– do not activate Broadcast.
– if the IP is not set then put 127.0.0.1 which is your PC (localhost),
– format: 2020
Notes For XBOX/PS4:
The IP address (192.168.x.x) is the IP of your PC running SLIMax Mgr Pro and you can use F1 2017 Console Bridge with UDP Format: Legacy or OLD
F1 2019 PC Steam and XB1/PS4 Console version (API v7)
(disable native support of SLI-PRO, G27 and Fanatec hardware)
The UDP Settings are now directly available in the game UDP settings
To configure F1 2019, simply launch the game and in Telemetry settings
– set Fanatec LED OFF
– set SLI-PRO LED OFF
– set UDP Telemetry to ON
– set the rate to 60Hz,
– do not activate Broadcast.
– if the IP is not set then put 127.0.0.1 which is your PC (localhost),
– format: 2019
Notes For XBOX/PS4:
The IP address (192.168.x.x) is the IP of your PC running SLIMax Mgr Pro and you can use F1 2017 Console Bridge with UDP Format: Legacy
DiRT Rally 2.0 (API v3)
Apply the change below to your hardware config xml file in
..\Documents\My Games\DiRT Rally 2.0\hardwaresettings\ directory

F1 2018 PC Steam and XB1/PS4 Console version (API v6)
(disable native support of SLI-PRO, G27 and Fanatec to let SLIMax Mgr Pro manage them)
The UDP Settings are now directly available in the game UDP settings
To configure F1 2018, simply launch the game and in UDP settings
– set Fanatec LED OFF
– set SLI-PRO LED OFF
– set UDP Telemetry to ON
– set the rate to 60Hz,
– do not activate Broadcast.
– if the IP is not set then put 127.0.0.1 which is your PC (localhost),
– format: 2018

Notes For XBOX/PS4:
The IP address (192.168.x.x) is the IP of your PC running SLIMax Mgr Pro and you can use F1 2017 Console Bridge with UDP Format: Legacy
F1 2017 PC Steam and XB1/PS4 Console version (API v5)
(disable native support of SLI-PRO, G27 and Fanatec to let SLIMax Mgr Pro manage them)
The UDP Settings are now directly available in the game UDP settings
– to configure F1 2017, simply launch the game and in settings
– set Fanatec LED OFF
– set SLI-PRO LED OFF
– set UDP Telemetry to ON
– the rate to 60Hz,
– do not activate Broadcast.
– if the IP is not set then put 127.0.0.1 which your PC (localhost).
Notes For XBOX/PS4:
The IP (192.168.x.x) of your PC running SLIMax Mgr Pro and the Console Bridge must be entered.

For Console XBOX and PS4 version of the game, insert the IP of the PC 192.168.xxx.xxx
(the PC where SLIMax Mgr Pro and F1 2017 Console Bridge are running, see the Console Forum for more info)
DiRT 4 (API v3)
Apply the change below to your hardware config xml file in
..\Documents\My Games\DiRT 4\hardwaresettings\ directory

F1 2016 (API v4)
(disable native support of SLI-PRO, G27 and Fanatec to let SLIMax Mgr Pro manage them)
Apply the change below to your hardware config xml file in
..\Documents\My Games\F1 2016\hardwaresettings\ directory,

DiRT Rally (API v3)
Apply the change below to your hardware config xml file in
..\Documents\My Games\Dirt Rally\hardwaresettings\ directory

F1 2015 (API v4)
(disable native support of SLI-PRO, G27 and Fanatec to let SLIMax Mgr manage them)
Apply the change below to your hardware config xml file in
..\Documents\My Games\F1 2015\hardwaresettings\ directory,
F1 2014 (API v3)
(disable native support of G27 and Fanatec to let SLIMax Mgr manage them)
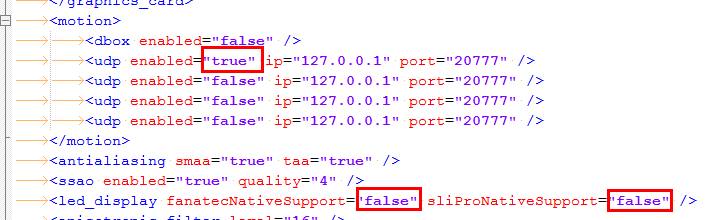
Apply the change (red text) below to your hardware config xml file in
..\Documents\My Games\FormulaOne2014\hardwaresettings\ directory, sometime it’s necessary to add the line if doesn’t exists.
Find:
<motion enabled="true" extradata="0" delay="1" port="20777" ip="dbox"/>

<led_display nativeSupport="true"/>


and replace with:
<led_display nativeSupport="false" fanatecNativeSupport="false" />

<motion enabled="true" ip="127.0.0.1" port="20777" delay="1" extradata="3" />
F1 2013 (API v3)
(disable native support of G27 and Fanatec to let SLIMax Mgr manage them)
Apply the change (red text) below to your hardware config xml file in
..\Documents\My Games\FormulaOne2013\hardwaresettings\ directory, sometime it’s necessary to add the line if doesn’t exists.
Find:
<motion enabled="true" extradata="0" delay="1" port="20777" ip="dbox"/>

<led_display nativeSupport="true"/>


and replace with:
<led_display nativeSupport="false" fanatecNativeSupport="false" />

<motion enabled="true" ip="127.0.0.1" port="20777" delay="1" extradata="3" />
GRID 2 (API v3)
Apply the change below to your hardware config xml file in
..\Documents\My Games\GRID 2\hardwaresettings\ directory
Find:
<motion enabled="true" extradata="0" delay="1" port="20777" ip="dbox"/>


and replace with:
<motion enabled=”true” ip=”127.0.0.1″ port=”20777″ delay=”1″ extradata=”3″ />
F1 2012 (API v2)
(disable native support of G27 and Fanatec to let SLIMax Mgr manage them)
A:Apply the change (red text) below to your hardware config xml file in
..\Documents\My Games\FormulaOne2012\hardwaresettings\ directory, sometime it’s necessary to add the line if doesn’t exists.
Find:
<motion enabled="true" extradata="0" delay="1" port="20777" ip="dbox"/>

<led_display nativeSupport="true"/>


and replace with:
<led_display nativeSupport="false" fanatecNativeSupport="false" />

<motion enabled="true" ip="127.0.0.1" port="20777" delay="1" extradata="2" />
F1 2011 (API v1)
A:Apply the change (red text) below to your hardware config xml file in
..\Documents\My Games\FormulaOne2011\hardwaresettings directory
Find:
<motion enabled="true" extradata="0" delay="1" port="20777" ip="dbox"/>


and replace with:
<motion enabled="true" ip="127.0.0.1" port="20777" delay="1" extradata="1" />
F1 2010 (API v1)
Apply the change (red text) below to your hardware config xml file in
..\Documents\My Games\FormulaOne\hardwaresettings\ directory
Find:
<motion enabled="true" extradata="0" delay="1" port="20777" ip="dbox"/>


and replace with:
<motion enabled="true" ip="127.0.0.1" port="20777" delay="1" extradata="1" />
DiRT3 and DiRT2 (API v1)
Apply the change below to your hardware config xml file in
..\Documents\My Games\Dirt3\hardwaresettings\ directory
Find:
<motion enabled="true" extradata="0" delay="1" port="20777" ip="dbox"/>


and replace with:
<motion enabled="true" ip="127.0.0.1" port="20777" delay="1" extradata="1" />
.
10+ yo Account Expired, License Renewal & Supporting Ledsmaster
Dear Users,
We’ve noticed some of you are seeing a message about your license being “expired” or “not found” after updating. We completely understand the confusion, so we’d like to clarify what’s happening.
Why is my license expired?
Licenses for Ledsmaster formerly SLIMax Manager Pro are valid for 10 years (as stated in our Terms of Use).
If your license is over 10 years old, it has simply reached its expiration date.
Many users get their license for free or made a small one-time donation for it (e.g., $7 or $10) many years ago, which we truly appreciate! However, keeping our software running and up to date requires ongoing support.
Why do we ask for donations?
Since 2009, more than 15 years ago, our software have been developed and maintained by our non-profit foundation. Your contributions help us cover for example:
Software updates & improvements
Compatibility with new systems and new games (plugins)
Servers & infrastructure costs
Support & maintenance
We’re proud to offer a professional-grade software at a very low cost, and we rely on your generosity to keep it going.
How can I renew my license?
You can keep using the older software but to support our non profit organization and use the full version of Ledsmaster and latest game plugins, you can simply renew your license with a small donation. Just remove the license key from the ../Documents/Ledsmaster/licenses/ folder and launch Ledsmaster to follow the regular registration process. This helps us sustain the project and continue delivering updates.
We truly appreciate your support over the years! If you have any questions, feel free to reach out. Thank you for being part of our community!
EKSIMRacing Foundation
How does the software cost?
Why I have to make a donation? and why a donation?
Thank you for your interest in EKSIMRacing foundation software. EKSIMRacing since 2007 works as a foundation (a non profit organization) to promote the sim-racing around the world. You are helping the EKSIMRacing projects by making a contribution. Building a professional-grade software takes a lot of time and money, maintaining the website, software support, domain name and web hosting cost money, also, game gear such steering wheels, pedals sets, buttons-boxes and hardware parts for testing the hardware with the software cost money (fortunately we have some great partnerships which reduces the bill) and obviously, buying/updating games/simulations licenses cost money as well. Making your contribution help the project remain active providing great software for the sim racing community.
Thank you all for your support.
Can I use the software commercially or in any business context?
The license expressly prohibit commercial use without a *PRO subscription (read the FAQ).
The license is for *PERSONAL USE ONLY*
if you run Ledsmaster, VDASH-EMU, SLIMax Manager Pro or MotionMax Manager in ANY BUSINESS CONTEXT then a PRO annual subscription or a PRO device license is needed to be in conformity of our Terms And Conditions (read the FAQ to get all benefit of PRO Registration).
Licensing & Donations
License and Pricing:
The software license is almost free and is obtained by making a donation to our nonprofit Foundation. Donations start at $1 or €1. To receive software support and full access to all features, a minimum donation of $5 or €5 is required.
ATTENTION WE ACCEPT DONATION IN $ USD (United States dollar) AND EURO (€) ONLY.
The total amount of your contribution determines the level of your support account subscription (Basic, Standard, Gold, etc.). Payments are processed securely through PayPal, you can pay using your PayPal account or with a credit or debit card if you don’t have an account.
Thank you for your support.
Need additional license after OS or ROM update?
DO NOT RESET YOUR ANDROID – DEDICATE YOUR TABLET TO THE EMU
Your license is no longer recognized after a reset or a major update of your Android System OS. Unfortunately, due to the design of this OS, this is normal.
We are sorry by this inconvenience. However, we will never ask you to reset or update your Android System and we recommend to dedicate your Android Phone/Tablet to your EMUlators.
A std OTA update from google usually not alter your Android EMU installation (it depends), We do not recommend to accept OTA our EMU works perfectly with Android v4.x or greater.
NO, the update of VDASH-EMU does not change anything in your license and it remains valid. Installing the updates of VDASH-EMU over it is the correct process for updating your EMU and you will never loose your license by updating it with a new version.
Yes, the Android system update or phone / tablet change requires a new license called “Additional”
Yes, every additional PC / LAPTOP running VDASH-EMU for Windows needs a VALID license called “Additional” to work at FULL SPEED with simulations or games
YES, you have LAG if you do not have a VALID licenses installed for all phone / tablet / PC using the VDASH-EMU on your LAN (you can use up to 4 VDASH-EMU simultaneously).
So do not reset your device! you don’t need to do that to run the EMU and before making a “bug/registration report” please, check if the serial number you registered matches the one you currently have… and if NOT get an “additional” license!
Get an Additional License
Contact us for more information.
1 General FAQ
Terms and Conditions and Support?
The latest Terms and Conditions and Support information are available HERE
Devices Supported
Check the new updated Ledsmaster F.A.Q., here
I sent an email and I didn’t received a reply, why?
You sent an email for software support:
If you read carefully the FAQ we do not do software support by email
You sent en email for hardware support:
If you read carefully the FAQ we do not do hardware support, contact your hardware supplier.
You sent an email to ask for software support but the answer is already in the FAQ or in videos tutorials, so search and read it and you will find your reply. Click to enter the F.A.Q.
We reply by email only to license issue or post-registration problem
(but the common answer is almost always to check your SPAM / JUNK MAILBOX to get instructions or notifications already sent to you). Feel free to contact us if you didn’t get the notification.
Register your USB Device or your Emulator
Register your USB Device or VDASH-EMU Emulator
WATCH THIS VIDEO FIRST
To lean how to download, install and register
your sim racing device (Fanatec, Thrustmaster, Leo Bodnar devices, SIM Display devices,…)
or our digital dash (VDASH-EMU) for Windows or Android
Video Ledsmaster download and installation
Thank you for your interest in EKSIMRacing foundation software
THE BASIC STEPS
IN SHORT
It’s very easy to use the software, watch the video above. Connect your device or run the VDASH-EMU, Download, install Ledsmaster server and then click the REGISTER button in Registration Information window to register your software license for your steering wheel, USB display device or VDASH-EMU.
FULL STEPS
Watch the video above and read the basic steps below to get started with your sim racing hardware.
The video above show up the steps to register and is applicable to all sim racing devices including steering wheel (Fanatec, Thrustmaster,…), SIM Display and Leo Bodnar displays and other supported devices.
During the installation the Windows firewall will prompt you to grant access to our software. This is needed to communicate with our licensing server to get your software license automatically.
1 Connect your USB device
– check if your sim racing hardware is recognized by Windows
or If you want to use the digital dash, click to download and run VDASH-EMU
2
Click to download and install the latest Ledsmaster server
3
CLICK TO READ HOW TO CONFIGURE YOUR GAME
– configure your game to send telemetry data. Ledsmaster needs to receive the car telemetry from the game to work properly. Also, you need to disable the native support of LED in the game options (if applicable).
More info related to each game supported can be found in the Plugins Pages
4 Before Registration
– run Ledsmaster server, click NO on first launch to register your license
5
When you are ready to register, select the Registration Information menu
The Registration Information dialog prompt you to register your software license when you launch Ledsmaster without a license, click “REGISTER” button to make your contribution to support the projects of our nonprofit foundation, then sign up your support account.
Donation issue from Japan, read the FAQ
Your software license and your support account is validated within 24h and a notification* is sent to you automatically (login your support account to read your pending messages ),
*IMPORTANT: the licensing system will not sent the notification when your license is ready if you don’t have a support account. Do not forget to sign up your support account after making your donation to receive the information to get started quickly with the software.
6 After Registration Completed
– launch Ledsmaster server. This time click YES to download, install and validate your software license automatically from our licensing server,
– run your favorite game
You basically do not need anything else to get started
It is recommended to follow the basic steps above. Use the default setup and enjoy your sim racing rig with your favorite game (Ledsmaster supports more than 60 games) and later start to customize your setup to suit your needs.
Hardware, Devices, EMU Supported
The current devices supported by Ledsmaster
(updated 2024-03) Ledsmaster manages all devices simultaneously. Get more info on Ledsmaster
VoCore USB Screen 4″, 4.3″, 5″, 6.8″ and Round
STREAM DECK MK2 and XL v1/v2 with VDASH-EMU (Windows).
Leo Bodnar Shift-Lights Interface (SLI)
USB Shift lights Interface ( SLI-F1, SLI-PRO and SLI-M) and game controllers from Leo Bodnar,
Fanatec Conversion Kit
– Leo Bodnar Fanatec Conversion Kit is supported
(This is a proprietary implementation and NOT an emulation of Fanatec driver and can be used WITHOUT FANATEC Driver)
– Darknao Conversion Kit based on Teensy LC board is supported
(this is an emulation of Fanatec Driver and Fanatec driver must be installed)
– latest Sim Racing Machines (SRM) Conversion Kit v5 is NOT YET supported due to a change of their firmware/board
(this is a proprietary implementation and do not require the Fanatec driver).
– oldest Sim Racing Machines (SRM) Conversion Kit based on Leo Bodnar board is supported.
(This is a proprietary implementation and NOT an emulation of Fanatec driver and can be used WITHOUT FANATEC Driver)
Fanatec Steering Wheel and Pedals Set
Almost all Fanatec rim* (including the latest Fomula V2.x steering wheel)
*Ledsmaster have been tested with latest Fanatec driver and firmware and compiled with latest Fanatec SDK v4.05+
The software manages all Fanatec hardware supported by the version 4.05 of the official Fanatec SDK.
Logitech
G25/G27/G29/G920/G923/G PRO Racing DD
Thrustmaster TS-PC Racer Ferrari 488 Challenge Edition
(All Other Thrustmaster Wheel Base buttons and encoders as generic device only)
Steelseries
Steelseries SRW-S1 steering wheel and also, support any HID Compliant hardware including, any buttons-box like the famous Derek Speare Designs (DSD) devices, any buttons and encoders controllers, joystick, gamepad, shifter, etc.
VDASH-EMU Sim Racing Digital Dash
VDASH-EMU sim racing digital dash (usb device firmware emulator of real racing dash and real button-box) From EKSIMRacing. VDASH-EMU For Windows includes the native support of VoCore screens. Check the VDASH-EMU page for more info.
SimDisplay Sim Racing Devices
SIM RACE LCD, SIM RACE GT, SIM RACE F1, SIM RACE Deluxe or SIM RACE PRO USB Shift lights Display devices from SIM Display,
Can I use the software commercially or in any business context?
[EN] Can I use the software commercially or in any business context?
The license is for *PERSONAL USE ONLY*
if you run Ledsmaster or SLIMax Manager or MotionMax Manager (all versions) in ANY BUSINESS CONTEXT then a PRO Annual Subscription or a PRO device license is needed to be in conformity of our Terms And Conditions. Any violation of our terms of use may result in the termination without notice of all previously registered licenses. (read the FAQ to get all benefit of PRO Registration).
[FR]Puis-je utiliser le logiciel commercialement ou dans n’importe quel contexte commercial?
La licence est pour * UTILISATION PERSONNELLE UNIQUEMENT
si vous exécutez Ledsmaster ou SLIMax Manager ou MotionMax Manager (toutes les versions) dans TOUT CONTEXTE COMMERCIAL ou PROFESSIONNEL vous devez alors souscrire à un abonnement annuel PRO ou une licence individuelle PRO pour être conforme à nos Conditions d’utilisation. Toutes infractions à nos conditions d’utilisation peuvent entraîner la résiliation sans préavis de toutes les licences préalablement enregistrées. (lisez la FAQ pour obtenir tous les avantages de l’enregistrement PRO).
[IT] Posso usare il software per scopi commerciali o in qualsiasi contesto commerciale?
La licenza è valida per * SOLO PER USO PERSONALE *
se si esegue Ledsmaster o SLIMax Manager o MotionMax Manager (tutte le versioni) in QUALSIASI CONTESTO COMMERCIALE o PROFESSIONNAL, è necessario un abbonamento PRO o licenza PRO per rispettare le nostre condizioni generali. Qualsiasi violazione dei nostri termini d’uso può comportare la risoluzione senza preavviso di tutte le licenze precedentemente registrate. (leggi le FAQ per ottenere tutti i vantaggi della registrazione PRO).
Getting Started With VDASH-EMU (virtual display emulator)
VDASH-EMU User guide Tips, Manual, Getting Started instructions, Tutorials are here.
Getting Started with VDASH-EMU
Configure simulation and game to send telemetry
Configure your game or simulation
Each game or simulation need to be configured to send telemetry data and to get it working with USB Shiftlights Device or to disable its native support of Fanatec or Logitech led and digits to let the SLIMax Manager handle them.
all updates information are available in Plugins Pages Forum
The plugins information page is a good source to know if your game is supported or not, check this HERE
Almost All Plugins are usually included in the installer of Ledsmaster. Select Check for update to get the latest version of plugins and keep your installation up to date.
Here is the list of plugins available at this date (check the plugins page for more info):
Official:
Read the FAQ: configure your game
Studio 397
Le Mans Ultimate,
rFactor Pro**,
rFactor 2,
rFactor,
rFactor Steam,
iRacing
iRacing,
Kunos Simulazioni
Assetto Corsa Pro**,
Assetto Corsa Rally,
Assetto Corsa EVO,
Assetto Corsa Competizione,
Assetto Corsa,
Assetto Corsa XBox/PlayStation Console Bridge,
KW Studios (Sector3)
RaceRoom Racing Experience,
All EA – CodeMasters games
WRC
EA SPORTS WRC 2023,
F1 Games
Codemasters / EA F1 25,
Codemasters / EA F1 25 XBox/PlayStation Console Bridge,
Codemasters / EA F1 24,
Codemasters / EA F1 24 XBox/PlayStation Console Bridge,
Codemasters / EA F1 23,
Codemasters / EA F1 23 XBox/PlayStation Console Bridge,
Codemasters / EA F1 22,
Codemasters / EA F1 22 XBox/PlayStation Console Bridge,
EA Grid Legends,
All CodeMasters games
Codemasters F1 2021,
Codemasters F1 2021 XBox/PlayStation Console Bridge,
Codemasters F1 2020,
Codemasters F1 2019,
Codemasters DiRT Rally 2.0,
Codemasters F1 2018,
Codemasters F1 2017,
Codemasters F1 2017 XBox/PlayStation Console Bridge,
Codemasters DiRT 4,
Codemasters DiRT Rally,
Codemasters F1 2016,
Codemasters F1 2016 XBox/PlayStation Console Bridge,
Codemasters F1 2015,
Codemasters F1 2014,
Codemasters F1 2013,
Codemasters F1 2012,
Codemasters F1 2011,
Codemasters F1 2010,
Codemasters GRID Autosport,
Codemasters GRID2,
Codemasters DiRT3,
Codemasters DiRT2,
Codemasters GRID,
ALL REIZA Studios
Automobilista 2,
Automobilista
Formula Truck (all versions),
Game Stock Car,
SMS Games
Project CARS 3,
Project CARS 2,
Project CARS 2 XBox/PlayStation Console Bridge,
Project CARS,
Project CARS XBox/PlayStation Console Bridge,
All rFactor Clones
ARCA Sim Racing,
Simraceway,
Superleague Formula,
Turismo Carretera,
Simbin Studios
Simbin GTR2,
Simbin Steam GTR2,
Simbin Steam Race07 + all packs,
Simbin GTR EVO,
Simbin RaceON,
Simbin RaceInjection,
Simbin STCC I / II,
Simbin WTCC,
Simbin Injection,
Simbin GT Power,
Simbin Retro Expansion,
Simbin DTM Experience,
Others
Forza Motorsport 2023 (beta),
WRC Generations,
Forza Horizon 4 (beta),
Forza Horizon 5 (beta),
Forza Motorsport 7 (beta),
BeamNG Drive,
KartKraft (Black Delta),
PiBoSo Kart Racing Pro,
PiBoSo MX Bikes,
PiBoSo GP Bikes,
PiBoSo World Racing Series,
GRally,Papyrus NASCAR 2003, (outdated)
Live For Speed,netKar PRO,(outdated)
Oldies
SMS SHIFT2,
Simbin GTR
Grand Prix Legends,
GT Legends,
Richard Burns Rally,
X Motor Racing,
SCS Software Truck Sim:
Euro Truck Simulation 2,
American Truck Simulator
Fligth-Sim
XPlane 10*,
XPlane 11*,
DCS World (Digital Combat Simulator),
Flight Simulator X (FSX)*,
Flight Simulator 2020 (FS2020)*,
Other
NoLimits Roller Coaster Simulation 2*
*Available on demand (not free)
**PRO custom plugins available to PRO subscribers only, contact us
   
|
|
||
 |
Install manually the rFactor Bridge (the bridge is installed automatically by SLIMax Mgr) | ||
| Disable native support of Fanatec of Assetto Corsa Competizione |
|||
| Disable native support of FANATEC and configure Assetto Corsa | |||
|
|
|
||
 |
Configure Simbin games/simulations | ||
 |
Configure Race Room Racing Experience from Sector3 Studios | ||
         
|
Configure Codemasters games
Disable native support of FANATEC and G27 in Codemasters
|
||
  |
Configure Project CARS | ||
 |
Configure Live For Speed | ||
rFactor Clones |
|||

|
Disable native support of FANATEC and G27/G29/920 and configure Automobilista
|
||
 |
|||
 |
|||
 |
|||
 |
|||
PiBoSo Titles |
|||
| Install PiBoSo Bridge For Kart Racing PRO (KRP) | |||
 |
Install PiBoSo Bridge For GP BIKES | ||
| Install PiBoSo Bridge For World Racing Series (WRS) | |||
OTHERS
|
|
Check the plugins pages for more info… |
Windows Protected Your PC Warning Message (For Apps Not From Windows Store)
Windows 10 and greater display a warning message if the application is not from Windows Store, click “Run anyway” and “Allow” to install Ledsmaster and let the app communicate with other devices.
Is PRO Registration needed if we use EKSIMRacing software for business or demo or in simulator?
PRO Registration or Renew Your PRO Subscription
Can I use the software commercially or in any business context?
The license is for *PERSONAL USE ONLY*
if you run Ledsmaster, SLIMax Manager or MotionMax Manager (all versions) in ANY BUSINESS CONTEXT then a PRO Annual Subscription or a PRO device license is needed to be in conformity of our Terms And Conditions. Any violation of our terms of use may result in the termination without notice of all previously registered licenses.
Do I need A PRO Subscription? yes if you:
– supply hardware products with Shiftlights device display supported by Ledsmaster (all versions) or MotionMax Manager (Steering wheel, button box, dashboard, simulator, mounting plates, etc.)
– provide service(s) using Ledsmaster (all versions) or MotionMax Manager (simulator, course, entertainment, etc. )
– demo your products with Ledsmaster (all versions) or MotionMax Manager (video, showcase, exhibition, etc. )
– provide a racing simulation services for drivers of any kind (services for entertainment or any other type of simulation service) that use our software or demo it with them.
– include any other business using Ledsmaster (all versions) or MotionMax Manager
IMPORTANT: Any violation of our terms of use may result in the termination without notice of all previously registered licenses
No doubt MotionMax Manager or Ledsmaster (all versions) increase the gaming experience and the immersion of your customers. The symbolic fee of PRO subscription allows taking into consideration all the work done in the manager since 2008 to provide the best sim-racing software. Any use of our software in business context must contribute to the projects by making a donation, obviously this is symbolic fee but it’s a way to contribute to the project and helps us to continue to provide the best manager of game and display devices. A professional grade development, highly customizable and with always more powerful features.
Register your company as a PRO and get your annual subscription by making your contribution per year to EKSIMRacing Projects
contact us if you need more info on PRO registration
PRO Subscriber can get access to:
– MotionMax, Ledsmaster and Racing Dash Emulator software support,
– worldwide Auto-Registration for your customers is allowed (your users do not have to worry about license, contact us by email for details)
– pre-ordering bulk licenses pack is allowed with discount price (contact us by email for details)
Contact us by email for more info ( pro_support | at | eksimracing DOT org)
PRO Register or Renew Your PRO Subscription:
Donation issue from Japan, read the FAQ
*subscription duration:
$60 = 6 months
$100 = 1 year
$250 = 3 years
$500 = 6 years (PRO VIP Tech. Support)
Contact us by email (or use this form) for more info


Redistributing software with or without your hardware product?
By using our software you agree to these terms and conditions see here
Redistributing our software shall not be allowed without our prior written consent (send an email with your details).
How does the software cost?
Why I have to make a donation? and why a donation?
Thank you for your interest in EKSIMRacing foundation software. EKSIMRacing since 2007 works as a foundation (a non profit organization) to promote the sim-racing around the world. You are helping the EKSIMRacing projects by making a contribution. Building a professional-grade software takes a lot of time and money, maintaining the website, software support, domain name and web hosting cost money, also, game gear such steering wheels, pedals sets, buttons-boxes and hardware parts for testing the hardware with the software cost money (fortunately we have some great partnerships which reduces the bill) and obviously, buying/updating games/simulations licenses cost money as well. Making your contribution help the project remain active providing great software for the sim racing community.
Thank you all for your support.
Can I use the software commercially or in any business context?
The license expressly prohibit commercial use without a *PRO subscription (read the FAQ).
The license is for *PERSONAL USE ONLY*
if you run Ledsmaster, VDASH-EMU, SLIMax Manager Pro or MotionMax Manager in ANY BUSINESS CONTEXT then a PRO annual subscription or a PRO device license is needed to be in conformity of our Terms And Conditions (read the FAQ to get all benefit of PRO Registration).
Licensing & Donations
License and Pricing:
The software license is almost free and is obtained by making a donation to our nonprofit Foundation. Donations start at $1 or €1. To receive software support and full access to all features, a minimum donation of $5 or €5 is required.
ATTENTION WE ACCEPT DONATION IN $ USD (United States dollar) AND EURO (€) ONLY.
The total amount of your contribution determines the level of your support account subscription (Basic, Standard, Gold, etc.). Payments are processed securely through PayPal, you can pay using your PayPal account or with a credit or debit card if you don’t have an account.
Thank you for your support.
Where to find the software features?
Read the readme, the FAQ, the forum post and learn. All specs and features are based on rFactor 2 and iRacing as they have the most complete sim-racing API. Other software may contain some or all of the functions implemented for these simulation. It depends on the simulation or game API (APPLICATION PROGRAMMING INTERFACE, i.e. Car and Contextual telemetry data and information provided by the simulation or game).
3 SLI-EMU FAQ
How to register additional license ( purchase additional license )?
REGISTER (purchase) ADDITIONAL LICENSE:
Register ADDITIONAL license is the same process as registering your first license. You need to use Ledsmaster and make a donation in USD to get your license.
EKSIMRacing Foundation is a nonprofit organization and ask you to take part to the project. To get your license consider making a simple donation. Thank you for your support.
Make your donation only, DO NOT CREATE A NEW SUPPORT ACCOUNT IF YOU ALREADY OWN ONE, double account is NOT allowed.
Run Ledsmaster
> Select Registration Info menu if the windows is not visible
> Select the device or emulator in the list
> And click the REGISTER button
> and make your donation
Check Your Account Profile (you need to have a support account):
if EKSRIMRacing $ credit is available, a BLUE button will be visible on your support account Profile.
Click the link below to be redirected to your support account profile (copy/paste your EMU SERIAL NUMBER to avoid any error):
Notes:
DO NOT CREATE A NEW SUPPORT ACCOUNT IF YOU ALREADY OWN ONE, just make your donation.
Registered but Still Waiting For My license…?
You have sent your registration form and your paypal donation for at least 24/48 hours and you have no news, no notification?
Please check your email SPAM JUNK MAILBOX first! and login to your account to check if you have some pending messages. All instructions to get started quickly are waiting for you. Contact us if you still need assistance.
THIS IS A COMMON PROBLEM your registration / donation is incomplete and the instructions has been sent to you using your email and are usually in your SPAM/JUNK mailbox of your Emailer or contact us by email.
What’s the main difference between application on Android that displays telemetry and an emulator?
What’s the main difference between application on Android that displays telemetry and an emulator?
The emulator has the same behavior as the real USB Device and emulate the FIRMWARE itself to send HID USB Reports through wifi network connection and obviously displays the information in the same way as the real device by drawing them dynamically on the screen. This is a challenge to get it working with NO LAG! because where the real device allows more than 1000 cycles of updates per second, Android allows on common smartphone less than 60 cycles/sec only…
When we read some comparisons of simple graphic dash apps for Android and VDASH-EMU Emulator! It’s like mixing apples and oranges.
VDASH-EMU literally simulate the REAL HARDWARE DEVICE behaviors…these graphic apps are nothing related to FIRMWARE EMULATION.
Using emulator let you give a try to the corresponding usb display device before buying or test some behaviors or new setups from your testing configuration like a laptop before applying them to your sim rig… Obviously, if you dedicate a phone/tablet to the EMU on your rig it can fully replace the real hardware device.
VDASH-EMU is accurate, fast enough to be compared to real display device and cheap compared to the corresponding price of real USB device.
Need additional license after OS or ROM update?
DO NOT RESET YOUR ANDROID – DEDICATE YOUR TABLET TO THE EMU
Your license is no longer recognized after a reset or a major update of your Android System OS. Unfortunately, due to the design of this OS, this is normal.
We are sorry by this inconvenience. However, we will never ask you to reset or update your Android System and we recommend to dedicate your Android Phone/Tablet to your EMUlators.
A std OTA update from google usually not alter your Android EMU installation (it depends), We do not recommend to accept OTA our EMU works perfectly with Android v4.x or greater.
NO, the update of VDASH-EMU does not change anything in your license and it remains valid. Installing the updates of VDASH-EMU over it is the correct process for updating your EMU and you will never loose your license by updating it with a new version.
Yes, the Android system update or phone / tablet change requires a new license called “Additional”
Yes, every additional PC / LAPTOP running VDASH-EMU for Windows needs a VALID license called “Additional” to work at FULL SPEED with simulations or games
YES, you have LAG if you do not have a VALID licenses installed for all phone / tablet / PC using the VDASH-EMU on your LAN (you can use up to 4 VDASH-EMU simultaneously).
So do not reset your device! you don’t need to do that to run the EMU and before making a “bug/registration report” please, check if the serial number you registered matches the one you currently have… and if NOT get an “additional” license!
Get an Additional License
Contact us for more information.
I have a license for SLI-M. Do I have to register and donate for the emu again?
A donation per device or emu is required to get your emulator license.
Reminder: Your license with Ledsmaster is valid for more than 60 games or simulations.
4 Registration And License
can’t get my Steelseries SRWheel-S1 (SRW-S1) license using “Online Validation” ?
Ledsmaster do not recognize my wheel and I cannot validate my software license
“Error: License Not Found (wrong serial number) or Failed To Download Your License Key!” ?
This is a rare bug in Steelseries SRW-S1 wheel firmware which return a different serial number from the one written on your wheel. The serial number usually contains a ‘*’. Contact your hardware supplier to replace your steering wheel.
Registration Information doesn’t display my Device SERIAL NUMBER?
we do not provide hardware support and this issue is NOT related to SLIMax Manager software. Contact your hardware supplier.
Is PRO Registration needed if we use EKSIMRacing software for business or demo or in simulator?
PRO Registration or Renew Your PRO Subscription
Can I use the software commercially or in any business context?
The license is for *PERSONAL USE ONLY*
if you run Ledsmaster, SLIMax Manager or MotionMax Manager (all versions) in ANY BUSINESS CONTEXT then a PRO Annual Subscription or a PRO device license is needed to be in conformity of our Terms And Conditions. Any violation of our terms of use may result in the termination without notice of all previously registered licenses.
Do I need A PRO Subscription? yes if you:
– supply hardware products with Shiftlights device display supported by Ledsmaster (all versions) or MotionMax Manager (Steering wheel, button box, dashboard, simulator, mounting plates, etc.)
– provide service(s) using Ledsmaster (all versions) or MotionMax Manager (simulator, course, entertainment, etc. )
– demo your products with Ledsmaster (all versions) or MotionMax Manager (video, showcase, exhibition, etc. )
– provide a racing simulation services for drivers of any kind (services for entertainment or any other type of simulation service) that use our software or demo it with them.
– include any other business using Ledsmaster (all versions) or MotionMax Manager
IMPORTANT: Any violation of our terms of use may result in the termination without notice of all previously registered licenses
No doubt MotionMax Manager or Ledsmaster (all versions) increase the gaming experience and the immersion of your customers. The symbolic fee of PRO subscription allows taking into consideration all the work done in the manager since 2008 to provide the best sim-racing software. Any use of our software in business context must contribute to the projects by making a donation, obviously this is symbolic fee but it’s a way to contribute to the project and helps us to continue to provide the best manager of game and display devices. A professional grade development, highly customizable and with always more powerful features.
Register your company as a PRO and get your annual subscription by making your contribution per year to EKSIMRacing Projects
contact us if you need more info on PRO registration
PRO Subscriber can get access to:
– MotionMax, Ledsmaster and Racing Dash Emulator software support,
– worldwide Auto-Registration for your customers is allowed (your users do not have to worry about license, contact us by email for details)
– pre-ordering bulk licenses pack is allowed with discount price (contact us by email for details)
Contact us by email for more info ( pro_support | at | eksimracing DOT org)
PRO Register or Renew Your PRO Subscription:
Donation issue from Japan, read the FAQ
*subscription duration:
$60 = 6 months
$100 = 1 year
$250 = 3 years
$500 = 6 years (PRO VIP Tech. Support)
Contact us by email (or use this form) for more info
Registered but Still Waiting For My license…?
You have sent your registration form and your paypal donation for at least 24/48 hours and you have no news, no notification?
Please check your email SPAM JUNK MAILBOX first! and login to your account to check if you have some pending messages. All instructions to get started quickly are waiting for you. Contact us if you still need assistance.
THIS IS A COMMON PROBLEM your registration / donation is incomplete and the instructions has been sent to you using your email and are usually in your SPAM/JUNK mailbox of your Emailer or contact us by email.
Registering Multiple Devices?
I have recently purchased a second SLI Pro and was wondering if I have to make a second donation to be able to use it as well as my other SLI Pro?
Yes, the license is bonded to the device itself not Ledsmaster, you need to register each device.
Transferable license to new owner?
if I sell an SLI Pro in the future, will the new owner be able to register that same device with the same serial number I already registered?
1) yes, USB Device License can be trasfered to new owner (EMU license is not transferable), ask the new owner to go in the website to get access to the FAQ, User guides and doc online.
2) the usb device license isn’t transferable for software support, The new owner must make its donation to get access to support forum and exclusive contents and create its support account. This is also a contribution to help us to maintain the forum, hosting service, domain name, updates, etc.
How do I know if I’m already registered?
1) you can login to your account in the software support forum (only registered account can login the support forum)
2) you have received a notification by email to confirm your registration (check your mailbox or spam folder)
3) click the “Account Profile” menu on Software Support Forum, all registered licenses are listed in your account
Minimum donation fee to acquire my device or emulator license?
A minimum contribution is required to obtain your software license. The total amount of your contribution determines the level of your support account subscription (Basic, Standard, Gold, etc.). Payments are processed securely through PayPal, you can pay using your PayPal account or with a credit or debit card if you don’t have one. (we only accept the USD US Dollar).
Click this line to get more info on How does the software cost?
I still didn’t received my device license key?
login to your support account and read your pending message.
ATTENTION: The notification email with instructions to get your license automatically is sent within 24/48h IF YOU HAVE A SUPPORT ACCOUNT
Check your SPAM JUNK folder and Mailbox if you didn’t get it! Contact us if you still need assistance.
How to get my license key if I lost it?
Do not register and donate again if you lost your license key or reinstall from scratch Ledsmaster,
The software will fetch AUTOMATICALLY your license online if it can’t find it locally. You don’t have to worry about your license.
If latest Ledsmaster server do not recognized your device and you registered your device before 2015, your license has expired, to validate your license and be able to use your device again, delete it from the licenses folder and follow instructions to register your license and create your support account. Contact us if you still need assistance.
How to register additional license ( purchase additional license )?
REGISTER (purchase) ADDITIONAL LICENSE:
Register ADDITIONAL license is the same process as registering your first license. You need to use Ledsmaster and make a donation in USD to get your license.
EKSIMRacing Foundation is a nonprofit organization and ask you to take part to the project. To get your license consider making a simple donation. Thank you for your support.
Make your donation only, DO NOT CREATE A NEW SUPPORT ACCOUNT IF YOU ALREADY OWN ONE, double account is NOT allowed.
Run Ledsmaster
> Select Registration Info menu if the windows is not visible
> Select the device or emulator in the list
> And click the REGISTER button
> and make your donation
Check Your Account Profile (you need to have a support account):
if EKSRIMRacing $ credit is available, a BLUE button will be visible on your support account Profile.
Click the link below to be redirected to your support account profile (copy/paste your EMU SERIAL NUMBER to avoid any error):
Notes:
DO NOT CREATE A NEW SUPPORT ACCOUNT IF YOU ALREADY OWN ONE, just make your donation.
Register your USB Device or your Emulator
Register your USB Device or VDASH-EMU Emulator
WATCH THIS VIDEO FIRST
To lean how to download, install and register
your sim racing device (Fanatec, Thrustmaster, Leo Bodnar devices, SIM Display devices,…)
or our digital dash (VDASH-EMU) for Windows or Android
Video Ledsmaster download and installation
Thank you for your interest in EKSIMRacing foundation software
THE BASIC STEPS
IN SHORT
It’s very easy to use the software, watch the video above. Connect your device or run the VDASH-EMU, Download, install Ledsmaster server and then click the REGISTER button in Registration Information window to register your software license for your steering wheel, USB display device or VDASH-EMU.
FULL STEPS
Watch the video above and read the basic steps below to get started with your sim racing hardware.
The video above show up the steps to register and is applicable to all sim racing devices including steering wheel (Fanatec, Thrustmaster,…), SIM Display and Leo Bodnar displays and other supported devices.
During the installation the Windows firewall will prompt you to grant access to our software. This is needed to communicate with our licensing server to get your software license automatically.
1 Connect your USB device
– check if your sim racing hardware is recognized by Windows
or If you want to use the digital dash, click to download and run VDASH-EMU
2
Click to download and install the latest Ledsmaster server
3
CLICK TO READ HOW TO CONFIGURE YOUR GAME
– configure your game to send telemetry data. Ledsmaster needs to receive the car telemetry from the game to work properly. Also, you need to disable the native support of LED in the game options (if applicable).
More info related to each game supported can be found in the Plugins Pages
4 Before Registration
– run Ledsmaster server, click NO on first launch to register your license
5
When you are ready to register, select the Registration Information menu
The Registration Information dialog prompt you to register your software license when you launch Ledsmaster without a license, click “REGISTER” button to make your contribution to support the projects of our nonprofit foundation, then sign up your support account.
Donation issue from Japan, read the FAQ
Your software license and your support account is validated within 24h and a notification* is sent to you automatically (login your support account to read your pending messages ),
*IMPORTANT: the licensing system will not sent the notification when your license is ready if you don’t have a support account. Do not forget to sign up your support account after making your donation to receive the information to get started quickly with the software.
6 After Registration Completed
– launch Ledsmaster server. This time click YES to download, install and validate your software license automatically from our licensing server,
– run your favorite game
You basically do not need anything else to get started
It is recommended to follow the basic steps above. Use the default setup and enjoy your sim racing rig with your favorite game (Ledsmaster supports more than 60 games) and later start to customize your setup to suit your needs.
How to get the display or emulator serial number?
GET USB DEVICE DISPLAY OR EMULATOR SERIAL NUMBER AND REGISTER:
To get the serial number of your USB Device Display, steering wheel or Android/Windows Emulator,
Make sure your hardware is installed and recognized by Windows, launch Ledsmaster (download the latest version) and the ‘Registration Information‘ window should show up the first time you launch the app, if it didn’t then select the menu “Registration Info…”
The Registration Info window will open automatically if your are not yet registered and/or your license is not found.
Select the device or emulator line and right-click to copy the type with the serial number.
Notes: the ‘– :‘ prefix before the serial number indicates that the license is not yet installed.
You have now successfully copied your device/emu serial number.
Click the REGISTER button to register and create your support account.
Can I use the software commercially or in any business context?
[EN] Can I use the software commercially or in any business context?
The license is for *PERSONAL USE ONLY*
if you run Ledsmaster or SLIMax Manager or MotionMax Manager (all versions) in ANY BUSINESS CONTEXT then a PRO Annual Subscription or a PRO device license is needed to be in conformity of our Terms And Conditions. Any violation of our terms of use may result in the termination without notice of all previously registered licenses. (read the FAQ to get all benefit of PRO Registration).
[FR]Puis-je utiliser le logiciel commercialement ou dans n’importe quel contexte commercial?
La licence est pour * UTILISATION PERSONNELLE UNIQUEMENT
si vous exécutez Ledsmaster ou SLIMax Manager ou MotionMax Manager (toutes les versions) dans TOUT CONTEXTE COMMERCIAL ou PROFESSIONNEL vous devez alors souscrire à un abonnement annuel PRO ou une licence individuelle PRO pour être conforme à nos Conditions d’utilisation. Toutes infractions à nos conditions d’utilisation peuvent entraîner la résiliation sans préavis de toutes les licences préalablement enregistrées. (lisez la FAQ pour obtenir tous les avantages de l’enregistrement PRO).
[IT] Posso usare il software per scopi commerciali o in qualsiasi contesto commerciale?
La licenza è valida per * SOLO PER USO PERSONALE *
se si esegue Ledsmaster o SLIMax Manager o MotionMax Manager (tutte le versioni) in QUALSIASI CONTESTO COMMERCIALE o PROFESSIONNAL, è necessario un abbonamento PRO o licenza PRO per rispettare le nostre condizioni generali. Qualsiasi violazione dei nostri termini d’uso può comportare la risoluzione senza preavviso di tutte le licenze precedentemente registrate. (leggi le FAQ per ottenere tutti i vantaggi della registrazione PRO).
Can’t make a donation from Japan, why?
If you try to make a Paypal donation from Japan and received this error message:

Login your Paypal account and send money to “Friend or Family” to the EKSIMRacing foundation email ( see the email in the picture above). It seems Japanese can no longer send donation since the April 2013!? this information need to be verified…
PayPalアカウントをログインし、eksimracing Foundationのメールに「友人または家族」にお金を送信します(上の写真のメールを参照)。 2013年4月以降、日本人はもはや寄付を送ることができないようです!? この情報を検証する必要があります…
How to get the display or emulator serial number?
copy the serial number from the “Registration Info” window
ディスプレイまたはエミュレータのシリアル番号を取得する方法は?
「登録情報」ウィンドウからシリアル番号をコピーする
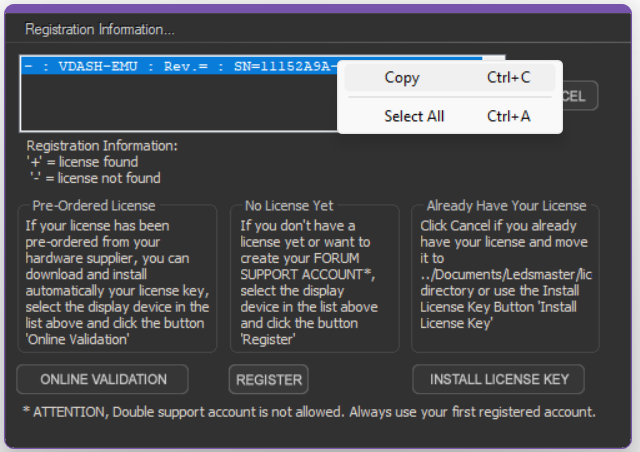
Also, don’t forget to add in Paypal comments:
– your FULL NAME in latin characters (Romaji)
– the type of USB device (VDASH-EMU, SLI-F1, SLI-PRO, SLI-M, SIM Race F1, SIM Race LCD, etc…)
– and the serial number
The correct device type + its serial number and your full name are absolutely needed to generate the license

Do I need to register as PRO?

Click To Read This FAQ
VIRTUALBOX Host Adapter Conflict
VIRTUALBOX Conflict: VirtualBox HOST / Ethernet adapter is catching/rerouting all inbound UDP stream and prevents Ledsmaster to communicate with VDASH-EMU. Disable the VIRTUALBOX Ethernet adapter on your Windows to be able to use the software.
How To Renew My Fanatec License After The Update?
Since version 0.9.0.5k the licensing system for Fanatec users has been adjusted. If your Ledsmaster license was previously bonded to your Fanatec wheel base, you will need to update it accordingly.
First, Check For Update to get the latest version of Ledsmaster and register the new license format of your Fanatec device.
All registered Fanatec users can simply log in to their account, copy their new license number, and apply the update free of charge if you acquired your license by making a minimum contribution to our nonprofit foundation. For others, please follow the normal registration process to make your donation.
Old Number Format:
…..-….-….-…AG
New Number Format:
XXXXXXXXXXXXXXXXXXXXXXXXXXXXXXXXXXXAG
We sincerely apologize for any inconvenience this may cause and appreciate your understanding as we continue to improve Ledsmaster for the best possible experience.
Thank you for your support!
Free Limited Mode Not Found
The “Free Limited” mode has been removed following user feedback. Many users found the nag screens frustrating and expressed a preference to support our non-profit foundation’s projects with a small contribution, rather than use a limited demo. Registration is now required to use the software. Thank you all for your continued support!
10+ yo Account Expired, License Renewal & Supporting Ledsmaster
Dear Users,
We’ve noticed some of you are seeing a message about your license being “expired” or “not found” after updating. We completely understand the confusion, so we’d like to clarify what’s happening.
Why is my license expired?
Licenses for Ledsmaster formerly SLIMax Manager Pro are valid for 10 years (as stated in our Terms of Use).
If your license is over 10 years old, it has simply reached its expiration date.
Many users get their license for free or made a small one-time donation for it (e.g., $7 or $10) many years ago, which we truly appreciate! However, keeping our software running and up to date requires ongoing support.
Why do we ask for donations?
Since 2009, more than 15 years ago, our software have been developed and maintained by our non-profit foundation. Your contributions help us cover for example:
Software updates & improvements
Compatibility with new systems and new games (plugins)
Servers & infrastructure costs
Support & maintenance
We’re proud to offer a professional-grade software at a very low cost, and we rely on your generosity to keep it going.
How can I renew my license?
You can keep using the older software but to support our non profit organization and use the full version of Ledsmaster and latest game plugins, you can simply renew your license with a small donation. Just remove the license key from the ../Documents/Ledsmaster/licenses/ folder and launch Ledsmaster to follow the regular registration process. This helps us sustain the project and continue delivering updates.
We truly appreciate your support over the years! If you have any questions, feel free to reach out. Thank you for being part of our community!
EKSIMRacing Foundation
5 Installation
Configure AMS2 to “Use Shared memory”?
Each time you upgrade Project CARS don’t forget to check the status of Shared memory in System Settings.
Automobilista 2
To turn ON telemetry go to SYSTEM > Use Shared Memory > Project CARS 2
Check the plugin page to get the latest info, HERE.
rFactor 2 Installation (including bridge):
The rFactor 2 bridge is a piece of code (dll plugin) that do the bridge between Ledsmaster and the game (rFactor2 and Le Mans Ultimate). The bridge do not manage any hardware and as such it can NOT be in conflict with your display or steering wheel or any hardware, this is just a “proxy” for telemetry data and can be safely installed.
Ledsmaster Installer copy the “bridge” dll for rFactor2 and Le Mans Ultimate into the correct directory if it detects your game installation.
if for some reason the Installer doesn’t find your game installation you have to install the bridge manually.
Use the Plugin Manager to edit the plugin Options and install the corresponding bridge
Note: In Options of game, Hardware Plugin must be activated
rFactor2SLIBridge.dll must be copied to:
C:\Program Files (x86)\steam\steamapps\common\rFactor2\Bin64\Plugins
Attention, the path is different if you have the rFactor 2 Steam version:
Steam\steamapps\common\rFactor 2\Bin64\Plugins\rFactor2SLIBridge_x64.dll
Installation of the game bridge for Le Mans Ultimate is same as rFactor2 the only difference is the path
(C:\Program Files (x86)\Steam\steamapps\common\Le Mans Ultimate)
all plugins information are available in Plugins Pages Forum

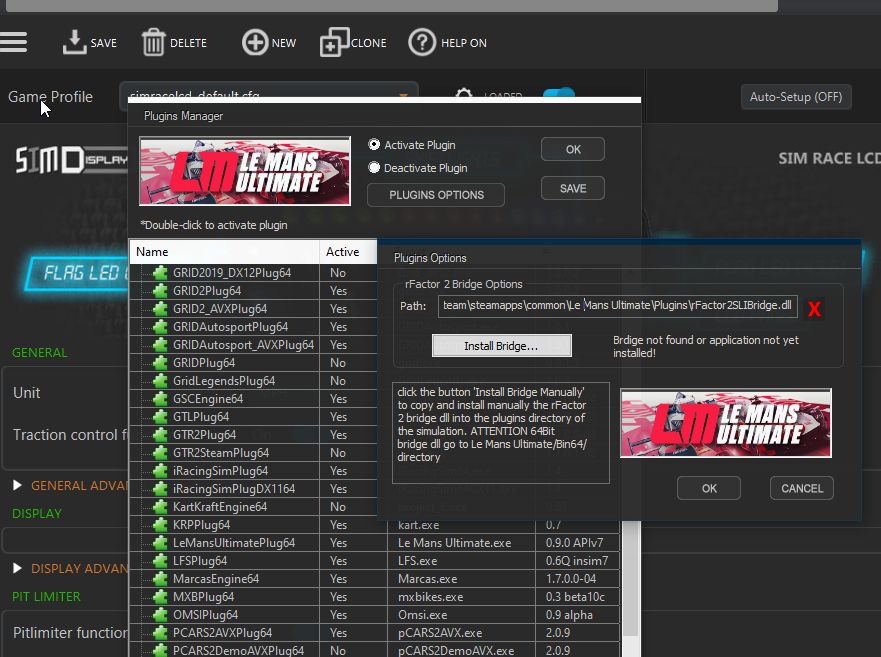
rFactor Installation (including bridge)?
The latest version of rFactor supported by SLIMax Manager are:
1.255F (Trymedia activation)
or
1.255G (ISI activation).
or
1.255G (Steam activation).
Plugins are already included with SLIMax Manager installer and ONLY the 1.255G (ISI) plugin is activated by default, see the version of the plugin in screenshots below and activate the corresponding version but activate ONLY ONE plugin at the same time.
**Do not activate ALL PLUGINS**
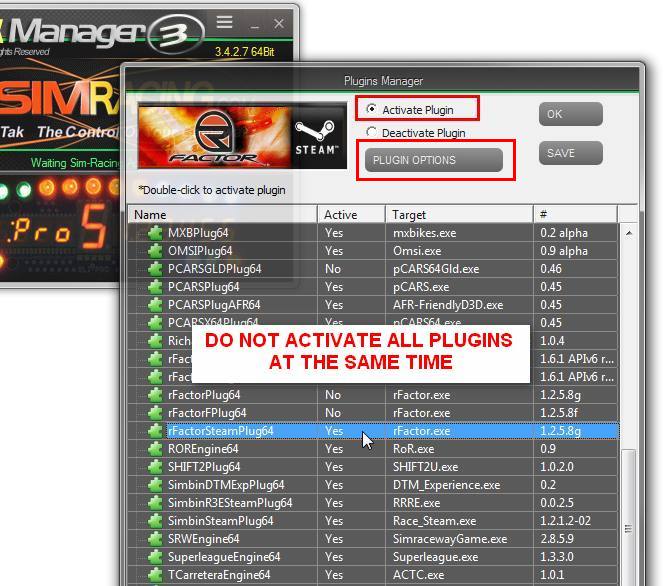
Check your version of rFactor:
Take a look to my screenshot and compare it with the size of your rFactor.exe…
Note: We do not support the DVD (boxed) version of rFactor and recommend to switch to DIGITAL version available on rFactor.net or Steam.
 |
 |
| 1.255f | 1.255g |
The SLIMax Mgr bridge is a piece of code (dll plugin) that do the bridge with SLIMax Mgr and the simulation. The bridge do not manage any hardware and as such it can NOT be in conflict with your display or steering wheel or any hardware, this is just a “proxy” for telemetry data and can be safely installed.
SLIMax Mgr installer copy a “bridge” dll into ../Program Files/rFactor/Plugins/ directory if it detects your rFactor installation.
if for some reason the SLIMax Manager Installer didn’t find your rFactor installation you have to install the bridge manually using the internal helper included with SLIMax Mgr v3.3 or greater.
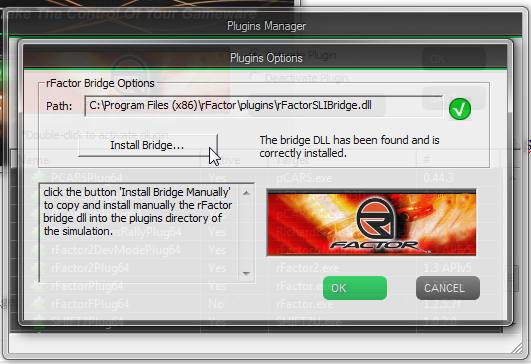
Note: To work with plugins the Hardware Plugin option must be activated in rFactor.
Live For Speed (LFS) Installation?
LFS installation:
SLIMax Manager Pro is already configured to work with LFS.
LFS Plugin Activation:
check if the plugin is activated first (see how to activate a plugin see here ). The LFS Plugin is ACTIVATED by default.
Edit LFS Configuration in LFS directory:
C:\Program Files (x86)\LFS\cfg.txt:
…
OutGauge Mode 2
OutGauge Delay 1
OutGauge IP 127.0.0.1
OutGauge Port 30005
OutGauge ID 0
…
start lfs with insim command (see picture attached) or create a shortcut
“C:\Program Files (x86)\LFS\LFS.exe” /insim=29999

AND activate the Qualify on single player mode (see pictures)

Do not forget to set the QUALIFY delay or SLIMax Mgr will never receive the necessary info to work with LFS.
if you know what you are doing and need to change the default setting, open the Plugin Manager to edit LFS Plugin Options:


Disable native support of FANATEC LED, Display in iRacing
Telemetry is enabled by default but at 60Hz if you use a 6DOF or 5DOF motion platform with MotionMax Manager change the rate of telemetry to 360Hz by editing the ../Documents/iRacing/app.ini file with a text editor:

To disable iRacing “native support” of your Fanatec Led/Display or Logitech G27/G29 Led to get access to all features of Ledsmaster and take a full control of your LED and digits, open iRacing Options and untick the Fanatec and G27 checkbox.

Related FAQ:
Configure your game or simulation to send telemetry data
How to configure PiBoSo Games ( Kart Racing PRO, GP Bikes, World Racing Series)?

Kart Racing PRO, GP Bikes and World Racing Series are based on same core game and all titles need their “bridge” to work with Ledsmaster. The bridge must be installed in the plugins directory of each games and is different for each game.
The Ledsmaster bridge is a piece of code (dll plugin) that do the bridge with Ledsmaster and the simulation. The bridge do not manage any hardware and as such it can NOT be in conflict with your display or steering wheel or any hardware, this is just a “proxy” for telemetry data and can be safely installed.
Kart Racing Pro
The bridge named “KRPSLIBridge.dlo” can be found in \Program Files (x86)\Ledsmaster\ directory and is normally installed automatically by Ledsmaster during the installation if the KRP directory is found.
If you want to install it manually move it to “C:\Program Files (x86)\Kart Racing Pro\plugins\“ directory.
Since release 8 of KRP the 64bit bridge plugin must be installed in the 64Bit game directory:
C:\Program Files\Kart Racing Pro\plugins\KRPSLIBridge.dlo
Using the Plugins Manager,
select the plugin
and click the Plugin Options button to open the wizard dialog
followed by Install Bridge button to select the krp.exe application
the wizard will install the bridge automatically

GP Bikes
The bridge named “GPBSLIBridge.dlo” can be found in \Program Files (x86)\Ledsmaster\ directory and is normally installed automatically by Ledsmaster during the installation if the GP Bikes directory is found.
If you want to install it manually move it to “C:\Program Files (x86)\GP Bikes\plugins\“ directory.
Since beta 15 of GP Bikes the 64bit bridge plugin must be installed in the 64Bit game directory:
C:\Program Files\GP Bikes\gpbikes\plugins\GPBSLIBridge.dlo
Using the Plugins Manager,
select the plugin
and click the Plugin Options button to open the wizard dialog
followed by Install Bridge button to select the GPB Bikes core.exe application
the wizard will install the bridge automatically

World Racing Series
Do not activate GP BIKES plugin and WRS plugin at the same time
The bridge named “WRSSLIBridge.dlo” can be found in \Program Files (x86)\Ledsmaster\ directory and is normally installed automatically by Ledsmaster during the installation if the WRS directory is found.
To install it manually move it to “C:\Program Files (x86)\World Racing Series\wrs\plugins\” directory.
MX Bikes
The bridge named “MXBSLIBridge.dlo” can be found in \Program Files (x86)\Ledsmaster\ directory and is normally installed automatically by Ledsmaster during the installation if the MX Bikes directory is found.
To install it manually move it to “C:\Program Files (x86)\MX Bikes\plugins\” directory.
“rFactor Clone” installation (Reiza Marcas, FTruck, GSC, SRW, Superleague,..)?
the Reiza bridge is a piece of code (dll plugin) that do the bridge with Ledsmaster and the simulation. The bridge do not manage any hardware and as such it can NOT be in conflict with your display or steering wheel or any hardware, this is just a “proxy” for telemetry data and can be safely installed.
rFactor “Clone” = simulation based on rFactor gMotor renderer.
You need to copy the rFactor “bridge” dll into ../Plugins/ directory of your “rFactor Clone” simulation. Use the internal helpers to install it automatically. Obviously the Hardware Plugin option in simulation or game settings must be allowed.

New Reiza titles (games and simulations like Game Stock Car, Formula FTruck, Game Petrobras de Marcas, etc. ) install automatically the Reiza bridge from their Sync System into Plugins directory of each game,
you should see the ReizaSLIMaxMgrBridge.dll and readme files in Plugins directory after sync and obviously the rFactorSLIBridge.dll can be removed. rFactorSLIBridge.dll is only used with rFactor 1.
Disable Native Support of Fanatec Hardware in Assetto Corsa
ATTENTION FANATEC OWNERS:
Since version 1.12 of Assetto Corsa you must now disable manually the Assetto Corsa native support of Fanatec display/led by editing the ../system/cfg/fanatec.ini file and set ENABLED=0
EDIT FANATEC.INI

SET ENABLED=0

Disable Native Support of Fanatec Hardware in Assetto Corsa Competizione

Since release 6 of Early Access of Assetto Corsa Competizione you can now disable the ACC native support of Fanatec display/led in the general game settings to enjoy your Fanatec device with our software.

Also, use Notepad++ to edit the controls.json file and set “EnableManufacturerExtras” to false to prevent the game to use the Logitech, Thrustmaster and Fanatec library. This is the best way to avoid any conflict with our software.
Disable native support of FANATEC in rFactor 2 and Le Mans Ultimate

Disable Fanatec native LED support in rFactor 2 or Le Mans Ultimate to use Ledsmaster:
For Le Mans Ultimate:
Quit LMU (IMPORTANT)
go to ..steamapps\common\Le Mans Ultimate\UserData\Controller\Presets\ directory
edit with Notepad++ all Fanatec Controller or just yours:
Fanatec CSL PS4.JSON
Fanatec CSL XBOX.JSON
Fanatec CSW v2.5.JSON
Fanatec CSW v2.JSON
Fanatec Podium DD1.JSON
Fanatec Podium DD2.JSON
Fanatec ClubSport PedalsV3.JSON
Fanatec CS DD – CSL DD – GT DD Pro.JSON
and set value of Hardware 3Digit Display:1,
to Hardware 3Digit Display:0,

on older version of LMU the game settings was available, seems that no longer the case

Open the game options and disable LED/DIGIT. That’s it!
For rFactor 2:
You must QUIT the game first
open your rFactor 2 profile in /Documents/rFactor 2 folder or for Steam version in your ../Steam/steamapps/rFactor 2 directory
open UserData/Player
and edit your current Fanatec profile to change:
Use Additional Hardware Features=”1” // Whether to use additional hardware features like steering wheel LED
Hardware 3Digit Display=”1” // If hardware has 3-digit display, 0=off, 1=gear, 2=speed
to
Use Additional Hardware Features=”0” // Whether to use additional hardware features like steering wheel LED
Hardware 3Digit Display=”0” // If hardware has 3-digit display, 0=off, 1=gear, 2=speed
IMPORTANT: Do the same thing in UserData/Controller
Attention, the rFactor 2 settings in latest version are inJSON format and to disable the native management of Fanatec LED you have to change the following tags in your /UserData/Player/Controller.JSON:
“Use Additional Hardware Features”:true,
to
“Use Additional Hardware Features”:false,
and
“Hardware 3Digit Display:1,
to
“Hardware 3Digit Display:0,
Related FAQ:
Configure your game or simulation to send telemetry data
Disable native support of FANATEC in Codemasters games
To let Ledsmaster manages the display and LED of your wheel, read this FAQ to disable native support of Fanatec (CSW, CSL, CSR, Porsche or others) and G27/G29 on Codemasters Games.
Related FAQ:
Configure your game or simulation to send telemetry data
Why do I get “NSIS Error” after downloading the full installer?
you get a
“NSIS-Error!.
with
“Installer integrity check has failed. Common cause include incomplete download and damaged media.
Contact the installer’s author to obtain a new copy. “
1) Your installer is really corrupted and need to be downloaded again
2) or simply your antivirus / firewall (mostly Norton and AVAST) prevent the full installer to be downloaded correctly,
deactivate the antivirus temporarily and download and install it again.
How to get Codemasters GRID 2 working with latest Ledsmaster?
Codemasters GRID 2
A: Apply the change below to your hardware config xml file in
..\Documents\My Games\Grid 2\hardwaresettings\ directory
<motion enabled="true" ip="127.0.0.1" port="20777" delay="1" extradata="3" />
</hardware_settings_config>
Configure Project CARS to “Use Shared memory”?
Each time you upgrade Project CARS don’t forget to check the status of Shared memory setting.
Project CARS 3
To turn ON telemetry go to SYSTEM > Use Shared Memory > Project CARS 2
Check the plugin page to get the latest info, HERE.
disable RPM/Gear feedback in Settings > Wheel & FFB
Project CARS 2
To turn ON telemetry go to SYSTEM > Use Shared Memory > Project CARS 2
Check the plugin page to get the latest info, HERE.
Also, if you have a Fanatec wheel disable RPM/Gear feedback in OPTIONS > CONTROLS > Configuration see the picture below:
Project CARS 1
To turn ON telemetry go to Gameplay > Use Shared Memory > Yes
Check the plugin page to get the latest info, HERE.
Also, if you have a Fanatec (CSW or others) wheel disable RPM/Gear feedback in Controls Setup see the picture below:
Related FAQ:
Configure your game or simulation to send telemetry data
For more info visit: https://www.eksimracing.org
Disable native support of FANATEC in Automobilista
Disable Fanatec (CSW or others) native support of Automobilista to use Ledsmaster:

You must QUIT Automobilista first
open your Automobilista profile in your ../Steam/steamapps/Automobilista directory
open UserData/Controller
and edit your current Fanatec profile to change:
Use Additional Hardware Features=”1” // Whether to use additional hardware features like steering wheel LED
Hardware 3Digit Display=”1″ // If hardware has 3-digit display, 0=off, 1=gear, 2=speed
to
Use Additional Hardware Features=”0” // Whether to use additional hardware features like steering wheel LED
Hardware 3Digit Display=”0” // If hardware has 3-digit display, 0=off, 1=gear, 2=speed

Related FAQ:
Configure your game or simulation to send telemetry data
Led of my Logitech steering wheel not working, why?
Your Logitech G29 or G923 or PRO RACING WHEEL rev-led (shiftlights) is not working properly on Windows 10 or Windows 11
Unfortunately there’s a significant issue with G HUB driver on Windows 10/11 which prevent to get access to the rev led (shift-lights) features from SLIMax Manager Pro or from game apps. Sometime this is working after uninstalling G HUB or just quitting G Hub but most of the time it doesn’t work. however, everything is working as expected on Windows 7 using G HUB for Windows 7.
G27 use its own driver and not G HUB so it works.
To get your rev-led ready for SLIMax Manager Pro do not install G Hub but “Logitech Gaming software” (LGS). The steering wheel driver is correctly installed even if LGS indicates no usb device detected after installation (it’s safe to uncheck run at startup in LGS settings and exit LGS).
Follow these links below to download the corresponding version:
Windows 10/11 64-bit
https://download01.logi.com/web/ftp/pub/techsupport/gaming/LGS_9.04.49_x64_Logitech.exe

Windows 8/7 64-bit
https://download01.logi.com/web/ftp/pub/techsupport/gaming/LGS_9.02.74_x64_Logitech.exe

Logitech Gaming Software Download link:
https://support.logi.com/hc/en-us/articles/360025298053
VIRTUALBOX Host Adapter Conflict
VIRTUALBOX Conflict: VirtualBox HOST / Ethernet adapter is catching/rerouting all inbound UDP stream and prevents Ledsmaster to communicate with VDASH-EMU. Disable the VIRTUALBOX Ethernet adapter on your Windows to be able to use the software.
Free Limited Mode Not Found
The “Free Limited” mode has been removed following user feedback. Many users found the nag screens frustrating and expressed a preference to support our non-profit foundation’s projects with a small contribution, rather than use a limited demo. Registration is now required to use the software. Thank you all for your continued support!
Using 2 identical SLI devices alternatively on the same PC ( 2 SLI-PRO or 2 SIM RACE F1 for example)?
The same installation can be use with all your registered devices
How to activate or deactivate plugin?
Select the Plugins Manager to activate your plugin.
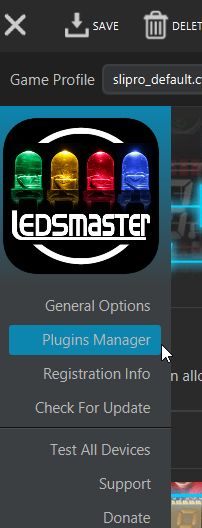

6 Setup And Configuration
Configure AMS2 to “Use Shared memory”?
Each time you upgrade Project CARS don’t forget to check the status of Shared memory in System Settings.
Automobilista 2
To turn ON telemetry go to SYSTEM > Use Shared Memory > Project CARS 2
Check the plugin page to get the latest info, HERE.
Why the ABS Effect not working with my Fanatec CSP?
FANATEC ABS And THROTTLE Effects
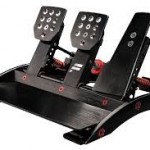
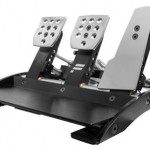

The true ABS Effect works ONLY with simulation or game API that provide a DYNAMIC status level of ABS like the old Live For Speed game…
if you try this effect with a STATIC value of ABS level (almost all sim/games), this will not be a TRUE ABS effect but it can be cool as well, give it a try and you will see… 😉
You need the latest version of Ledsmaster and CSP (Fanatec Pedals Set V2/V3)
Important points to know about ABS Effect behavior:
- The ABS Effect needs a dynamic ABS Level value to work as A TRUE abs effect (Live For Speed provides this telemetry data for example)
- Activate the effect on other sim with static value result to vibrate the brake pedal when pressed and is called a “fake ABS Effect” but seems to be appreciated by Codemasters F1 fanboys 😉
- See the screenshots, the recommended value in Fanatec setup is 115 to 220 (135 to 200 is good) and obviously the setup must be selected
When it is connected to USB Port as a standalone Pedals Set edit the CSP device setup (recommended)


When CSP is connected to the Base wheel edit your Fanatec setup:
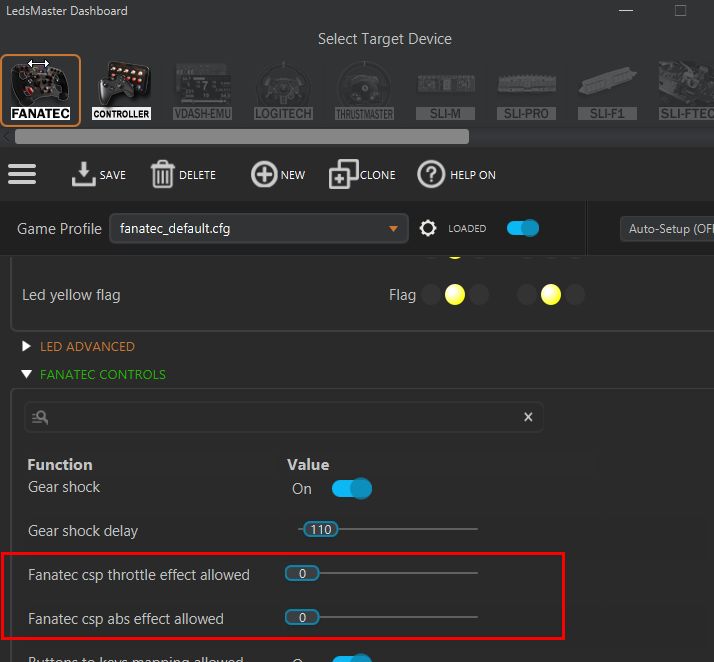
Notes:
IMPORTANT: Do not forget to activate the throttle Axe #1 on CSP v3 setup
Ledsmaster have a potential issue which prevent to use the ABS Effect with your CSP if more than ONE controller is connected (the second controller can potentially reset to zero the ABS effect). You may need to activate the ABS effect on all controllers connected to fix it.
iRacing COMBO SETUP behaviors included
“COMBO” setups are outdated and only provided for backward compatibility, we recommend to use other car setups or create your own.
For your convenience, SLIMax Manager is provided with a COMBO SETUP for iRacing simulation that choose automatically the right settings for you depending the car you drive. This can be very useful as the shiftlights method, Optimal Shiftpoints and other settings are selected automatically to reflect the engine specs but the disadvantage is that any settings change made with SLIMax Mgr (i.e. in Basic or Advanced Options… ) will be discarded in favor of the COMBO SETUP which use a script to supersede all other settings…
2 solutions:
1) No change, you are happy with the current iRacing Combo Setup, it is good enough for you
2) Disable iRacing Combo, don’t choose the setup named …_iracing_combo.cfg and go to “Select Devices Setups” menu and choose the default settings for your device and create your own. See how to create a custom setup step by step FAQ.
Is it possible to have the gear showing with the limiter on?
Yes, open Advanced Options panel edit your setup and allow or disallow the Limiter char in Pit limiter section.
Codemasters DiRT 3 PATCH Beware!
Since the last update 1.2 of Codemasters DiRT3, all motion simulators and outgauge software are not working anymore (those using extradata=”1” – extended UDP packet with information needed for SLI Devices).
Beware, DO NOT UPDATE any more your Codies games or downgrade if possible to continue using your rig. We are waiting for a new patch that will fix it…
ATTENTION: DiRT Showdown 1.0 seems to be affected by this nasty bug!

LFS Hot Lap challenge not working, why?
Impossible, Live For Speed API doesn’t allow to use outgauge info in hot lap challenge mode.

Disable Native Support of Fanatec Hardware in Assetto Corsa
ATTENTION FANATEC OWNERS:
Since version 1.12 of Assetto Corsa you must now disable manually the Assetto Corsa native support of Fanatec display/led by editing the ../system/cfg/fanatec.ini file and set ENABLED=0
EDIT FANATEC.INI
SET ENABLED=0
Configure Project CARS to “Use Shared memory”?
Each time you upgrade Project CARS don’t forget to check the status of Shared memory setting.
Project CARS 3
To turn ON telemetry go to SYSTEM > Use Shared Memory > Project CARS 2
Check the plugin page to get the latest info, HERE.
disable RPM/Gear feedback in Settings > Wheel & FFB
Project CARS 2
To turn ON telemetry go to SYSTEM > Use Shared Memory > Project CARS 2
Check the plugin page to get the latest info, HERE.
Also, if you have a Fanatec wheel disable RPM/Gear feedback in OPTIONS > CONTROLS > Configuration see the picture below:
Project CARS 1
To turn ON telemetry go to Gameplay > Use Shared Memory > Yes
Check the plugin page to get the latest info, HERE.
Also, if you have a Fanatec (CSW or others) wheel disable RPM/Gear feedback in Controls Setup see the picture below:
Related FAQ:
Configure your game or simulation to send telemetry data
For more info visit: https://www.eksimracing.org

Configure Race Room Racing Experience (R3E) From Sector3 Studios
The configuration is pretty simple as the “shared memory” flag (allow sending data that contains car telemetry and contextual info) is already activated.
You just need to deactivated the Fanatec Native support if you own a Fanatec steering wheel, goto control settings and map any button or keyboard Key to REV LED’s Toggle and Fanatec LED/Display functions to be able to switch OFF the native management (press several time until OFF is displayed) and let SLIMax Manager takes the control of your Fanatec wheel LED/DISPLAY.
New version of the RaceRoom Launcher:


Old Version:

2 settings to bypass the Fanatec display (3xDIGITS panel or the OLED display) and the REV LED and FLAG LED
Thanks to R3E Developers we have now a simple way to bypass of the native Fanatec management.
[OUTDATED] Very Old version ( no longer needed ):
You need to edit your ControlSet file each time you change your devices configuration (Controller Profile in game settings). The file is available in
c:\Users\-username-\Documents\MyGame\Simbin\RaceRoom Racing Experience Install #\UserData\ControlSet\
Edit the file with a text editor and set the tag below to 0 (zero):
G27 Led range low=”0.0″ // Min: 0.00, Max: 1.00, Default: 0.81
G27 Led range high=”0.0″ // Min: 0.00, Max: 1.00, Default: 0.96
Led Display Enabled=”0″ // Steering Wheel Led Display Default: 1

IMPORTANT: CAP The Frame Rate!
Well, it seems in current version of R3E that you can’t limit the FPS to give some CPU to all other apps running in background, this is a limitation of the simulation… For now we suggest to activate the VSync in video settings if your monitors is under 60Hz…
Disable Native Support of Fanatec Hardware in Assetto Corsa Competizione
Since release 6 of Early Access of Assetto Corsa Competizione you can now disable the ACC native support of Fanatec display/led in the general game settings to enjoy your Fanatec device with our software.
Also, use Notepad++ to edit the controls.json file and set “EnableManufacturerExtras” to false to prevent the game to use the Logitech, Thrustmaster and Fanatec library. This is the best way to avoid any conflict with our software.
Disable native support of FANATEC in rFactor 2 and Le Mans Ultimate
Disable Fanatec native LED support in rFactor 2 or Le Mans Ultimate to use Ledsmaster:
For Le Mans Ultimate:
Quit LMU (IMPORTANT)
go to ..steamapps\common\Le Mans Ultimate\UserData\Controller\Presets\ directory
edit with Notepad++ all Fanatec Controller or just yours:
Fanatec CSL PS4.JSON
Fanatec CSL XBOX.JSON
Fanatec CSW v2.5.JSON
Fanatec CSW v2.JSON
Fanatec Podium DD1.JSON
Fanatec Podium DD2.JSON
Fanatec ClubSport PedalsV3.JSON
Fanatec CS DD – CSL DD – GT DD Pro.JSON
and set value of Hardware 3Digit Display:1,
to Hardware 3Digit Display:0,
on older version of LMU the game settings was available, seems that no longer the case
Open the game options and disable LED/DIGIT. That’s it!
For rFactor 2:
You must QUIT the game first
open your rFactor 2 profile in /Documents/rFactor 2 folder or for Steam version in your ../Steam/steamapps/rFactor 2 directory
open UserData/Player
and edit your current Fanatec profile to change:
Use Additional Hardware Features=”1” // Whether to use additional hardware features like steering wheel LED
Hardware 3Digit Display=”1” // If hardware has 3-digit display, 0=off, 1=gear, 2=speed
to
Use Additional Hardware Features=”0” // Whether to use additional hardware features like steering wheel LED
Hardware 3Digit Display=”0” // If hardware has 3-digit display, 0=off, 1=gear, 2=speed
IMPORTANT: Do the same thing in UserData/Controller
Attention, the rFactor 2 settings in latest version are inJSON format and to disable the native management of Fanatec LED you have to change the following tags in your /UserData/Player/Controller.JSON:
“Use Additional Hardware Features”:true,
to
“Use Additional Hardware Features”:false,
and
“Hardware 3Digit Display:1,
to
“Hardware 3Digit Display:0,
Related FAQ:
Configure your game or simulation to send telemetry data
Disable native support of FANATEC in Codemasters games
To let Ledsmaster manages the display and LED of your wheel, read this FAQ to disable native support of Fanatec (CSW, CSL, CSR, Porsche or others) and G27/G29 on Codemasters Games.
Related FAQ:
Configure your game or simulation to send telemetry data
Fanatec Formula Rim buttons index to use with Buttons to keys (chars) mapping
Fanatec CSW Formula Rim buttons index

iRacing or F1 201x Combo Setup vs Simple Setup
Click To Read This FAQ
Disable native support of FANATEC LED, Display in iRacing
Telemetry is enabled by default but at 60Hz if you use a 6DOF or 5DOF motion platform with MotionMax Manager change the rate of telemetry to 360Hz by editing the ../Documents/iRacing/app.ini file with a text editor:
To disable iRacing “native support” of your Fanatec Led/Display or Logitech G27/G29 Led to get access to all features of Ledsmaster and take a full control of your LED and digits, open iRacing Options and untick the Fanatec and G27 checkbox.
Related FAQ:
Configure your game or simulation to send telemetry data
How To Get Codemasters F1 20xx Dirt2 And Dirt3 Working With Latest Software
ATTENTION (common error):
Here we are talking about setup the game to send telemetry data by editing the setup file in ../DOCUMENTS/MY GAMES/ directory and NOT in the game directory.
More infos available in Plugins Pages
F1 25 PC Steam and XB/PS Console version (API v13)
(disable native support of SLI-PRO, Thrustmaster and Fanatec hardware)
The UDP Settings are now directly available in the game UDP settings
To configure F1 25, launch the game and in Telemetry settings:
– set Fanatec LED OFF
– set SLI-PRO LED OFF
– set UDP Telemetry to ON
– set the rate to 60Hz,
– do not activate Broadcast.
– if the IP is not set then put 127.0.0.1 which is your PC (localhost),
– format: 2025
Notes For XBOX/PlayStation PS5/PS4:
The “REMOTE Management” configuration is available in Plugins Pages
F1 24 PC Steam and XB/PS Console version (API v12)
(disable native support of SLI-PRO, Thrustmaster and Fanatec hardware)
The UDP Settings are now directly available in the game UDP settings
To configure F1 24, launch the game and in Telemetry settings:
– set Fanatec LED OFF
– set SLI-PRO LED OFF
– set UDP Telemetry to ON
– set the rate to 60Hz,
– do not activate Broadcast.
– if the IP is not set then put 127.0.0.1 which is your PC (localhost),
– format: 2024
Notes For XBOX/PlayStation PS5/PS4:
The “REMOTE Management” configuration is available in Plugins Pages
F1 23 PC Steam and XB/PS Console version (API v11)
(disable native support of SLI-PRO, Thrustmaster and Fanatec hardware)
The UDP Settings are now directly available in the game UDP settings
To configure F1 23, launch the game and in Telemetry settings:
– set Fanatec LED OFF
– set SLI-PRO LED OFF
– set UDP Telemetry to ON
– set the rate to 60Hz,
– do not activate Broadcast.
– if the IP is not set then put 127.0.0.1 which is your PC (localhost),
– format: 2023
Notes For XBOX/PlayStation PS5/PS4:
The “REMOTE Management” configuration is available in Plugins Pages
F1 22 PC Steam and XB/PS Console version (API v10)
(disable native support of SLI-PRO, G27 and Fanatec hardware)
The UDP Settings are now directly available in the game UDP settings
To configure F1 22, launch the game and in Telemetry settings:
– set Fanatec LED OFF
– set SLI-PRO LED OFF
– set UDP Telemetry to ON
– set the rate to 60Hz,
– do not activate Broadcast.
– if the IP is not set then put 127.0.0.1 which is your PC (localhost),
– format: 2022
Notes For XBOX/PlayStation PS5/PS4:
This “REMOTE Management” configuration includes:
– a game console connected to your LAN network
– a PC or laptop (also connected to your LAN) running SLIMax Manager Pro and the F1 22 Console bridge app
– USB dash display connected to your PC or Laptop
– or/and a VDASH-EMU running on Windows or Android Tablet
(VDASH-EMU is recommended so you can put the tablet under the TV to get a clear view of telemetry data during your game session on console)
follow the above instruction to activate telemetry in game but change the IP:
– Enter the IP address (192.168.x.x) of your PC running SLIMax Manager Pro
Check For Update to get the F1 22 Console Bridge app (installed automatically inside the SLIMax Manager Pro directory)
To start a session run the F1 22 Console Bridge on the PC after SLIMax Manager Pro
(find the app inside SLIMax Manager Pro application directory)
F1 2021 PC Steam and XB1/PS4 Console version (API v9)
(disable native support of SLI-PRO, G27 and Fanatec hardware)
The UDP Settings are now directly available in the game UDP settings
To configure F1 2021, launch the game and in Telemetry settings:
– set Fanatec LED OFF
– set SLI-PRO LED OFF
– set UDP Telemetry to ON
– set the rate to 60Hz,
– do not activate Broadcast.
– if the IP is not set then put 127.0.0.1 which is your PC (localhost),
– format: 2021
– set audience to: Restricted
Notes For XBOX/PS4:
This “REMOTE Management” configuration includes:
– a game console connected to your LAN network
– a PC or laptop (also connected to your LAN) running SLIMax Manager Pro and the F1 2021 Console bridge
– USB dash display connected to your PC or Laptop
– or/and a VDASH-EMU running on Windows or Android Tablet
(VDASH-EMU is recommended so you can put the tablet under the TV to get a clear view of telemetry data during your game session)
follow the above instruction to activate telemetry in game but change the IP:
– Enter the IP address (192.168.x.x) of your PC running SLIMax Manager Pro
Check For Update to get the F1 Console Bridge app (installed automatically inside the SLIMax Manager Pro directory)
To start a session run the F1 2021 Console Bridge on the PC after SLIMax Manager Pro
(find the app inside SLIMax Manager Pro application directory)
F1 2020 PC Steam and XB1/PS4 Console version (API v8)
(disable native support of SLI-PRO, G27 and Fanatec hardware)
The UDP Settings are now directly available in the game UDP settings
To configure F1 2020, simply launch the game and in Telemetry settings:
– set Fanatec LED OFF
– set SLI-PRO LED OFF
– set UDP Telemetry to ON
– set the rate to 60Hz,
– do not activate Broadcast.
– if the IP is not set then put 127.0.0.1 which is your PC (localhost),
– format: 2020
Notes For XBOX/PS4:
The IP address (192.168.x.x) is the IP of your PC running SLIMax Mgr Pro and you can use F1 2017 Console Bridge with UDP Format: Legacy or OLD
F1 2019 PC Steam and XB1/PS4 Console version (API v7)
(disable native support of SLI-PRO, G27 and Fanatec hardware)
The UDP Settings are now directly available in the game UDP settings
To configure F1 2019, simply launch the game and in Telemetry settings
– set Fanatec LED OFF
– set SLI-PRO LED OFF
– set UDP Telemetry to ON
– set the rate to 60Hz,
– do not activate Broadcast.
– if the IP is not set then put 127.0.0.1 which is your PC (localhost),
– format: 2019
Notes For XBOX/PS4:
The IP address (192.168.x.x) is the IP of your PC running SLIMax Mgr Pro and you can use F1 2017 Console Bridge with UDP Format: Legacy
DiRT Rally 2.0 (API v3)
Apply the change below to your hardware config xml file in
..\Documents\My Games\DiRT Rally 2.0\hardwaresettings\ directory
F1 2018 PC Steam and XB1/PS4 Console version (API v6)
(disable native support of SLI-PRO, G27 and Fanatec to let SLIMax Mgr Pro manage them)
The UDP Settings are now directly available in the game UDP settings
To configure F1 2018, simply launch the game and in UDP settings
– set Fanatec LED OFF
– set SLI-PRO LED OFF
– set UDP Telemetry to ON
– set the rate to 60Hz,
– do not activate Broadcast.
– if the IP is not set then put 127.0.0.1 which is your PC (localhost),
– format: 2018
Notes For XBOX/PS4:
The IP address (192.168.x.x) is the IP of your PC running SLIMax Mgr Pro and you can use F1 2017 Console Bridge with UDP Format: Legacy
F1 2017 PC Steam and XB1/PS4 Console version (API v5)
(disable native support of SLI-PRO, G27 and Fanatec to let SLIMax Mgr Pro manage them)
The UDP Settings are now directly available in the game UDP settings
– to configure F1 2017, simply launch the game and in settings
– set Fanatec LED OFF
– set SLI-PRO LED OFF
– set UDP Telemetry to ON
– the rate to 60Hz,
– do not activate Broadcast.
– if the IP is not set then put 127.0.0.1 which your PC (localhost).
Notes For XBOX/PS4:
The IP (192.168.x.x) of your PC running SLIMax Mgr Pro and the Console Bridge must be entered.
For Console XBOX and PS4 version of the game, insert the IP of the PC 192.168.xxx.xxx
(the PC where SLIMax Mgr Pro and F1 2017 Console Bridge are running, see the Console Forum for more info)
DiRT 4 (API v3)
Apply the change below to your hardware config xml file in
..\Documents\My Games\DiRT 4\hardwaresettings\ directory
F1 2016 (API v4)
(disable native support of SLI-PRO, G27 and Fanatec to let SLIMax Mgr Pro manage them)
Apply the change below to your hardware config xml file in
..\Documents\My Games\F1 2016\hardwaresettings\ directory,
DiRT Rally (API v3)
Apply the change below to your hardware config xml file in
..\Documents\My Games\Dirt Rally\hardwaresettings\ directory
F1 2015 (API v4)
(disable native support of SLI-PRO, G27 and Fanatec to let SLIMax Mgr manage them)
Apply the change below to your hardware config xml file in
..\Documents\My Games\F1 2015\hardwaresettings\ directory,
F1 2014 (API v3)
(disable native support of G27 and Fanatec to let SLIMax Mgr manage them)
Apply the change (red text) below to your hardware config xml file in
..\Documents\My Games\FormulaOne2014\hardwaresettings\ directory, sometime it’s necessary to add the line if doesn’t exists.
Find:
<motion enabled="true" extradata="0" delay="1" port="20777" ip="dbox"/>

<led_display nativeSupport="true"/>


and replace with:
<led_display nativeSupport="false" fanatecNativeSupport="false" />

<motion enabled="true" ip="127.0.0.1" port="20777" delay="1" extradata="3" />
F1 2013 (API v3)
(disable native support of G27 and Fanatec to let SLIMax Mgr manage them)
Apply the change (red text) below to your hardware config xml file in
..\Documents\My Games\FormulaOne2013\hardwaresettings\ directory, sometime it’s necessary to add the line if doesn’t exists.
Find:
<motion enabled="true" extradata="0" delay="1" port="20777" ip="dbox"/>

<led_display nativeSupport="true"/>


and replace with:
<led_display nativeSupport="false" fanatecNativeSupport="false" />

<motion enabled="true" ip="127.0.0.1" port="20777" delay="1" extradata="3" />
GRID 2 (API v3)
Apply the change below to your hardware config xml file in
..\Documents\My Games\GRID 2\hardwaresettings\ directory
Find:
<motion enabled="true" extradata="0" delay="1" port="20777" ip="dbox"/>


and replace with:
<motion enabled=”true” ip=”127.0.0.1″ port=”20777″ delay=”1″ extradata=”3″ />
F1 2012 (API v2)
(disable native support of G27 and Fanatec to let SLIMax Mgr manage them)
A:Apply the change (red text) below to your hardware config xml file in
..\Documents\My Games\FormulaOne2012\hardwaresettings\ directory, sometime it’s necessary to add the line if doesn’t exists.
Find:
<motion enabled="true" extradata="0" delay="1" port="20777" ip="dbox"/>

<led_display nativeSupport="true"/>


and replace with:
<led_display nativeSupport="false" fanatecNativeSupport="false" />

<motion enabled="true" ip="127.0.0.1" port="20777" delay="1" extradata="2" />
F1 2011 (API v1)
A:Apply the change (red text) below to your hardware config xml file in
..\Documents\My Games\FormulaOne2011\hardwaresettings directory
Find:
<motion enabled="true" extradata="0" delay="1" port="20777" ip="dbox"/>


and replace with:
<motion enabled="true" ip="127.0.0.1" port="20777" delay="1" extradata="1" />
F1 2010 (API v1)
Apply the change (red text) below to your hardware config xml file in
..\Documents\My Games\FormulaOne\hardwaresettings\ directory
Find:
<motion enabled="true" extradata="0" delay="1" port="20777" ip="dbox"/>


and replace with:
<motion enabled="true" ip="127.0.0.1" port="20777" delay="1" extradata="1" />
DiRT3 and DiRT2 (API v1)
Apply the change below to your hardware config xml file in
..\Documents\My Games\Dirt3\hardwaresettings\ directory
Find:
<motion enabled="true" extradata="0" delay="1" port="20777" ip="dbox"/>


and replace with:
<motion enabled="true" ip="127.0.0.1" port="20777" delay="1" extradata="1" />
.
How to speed up the refresh rate of laptime, it seems slowed down since version 3.1?
Open General Options and change the delay of lap time refresh rate and delta time refresh rate.


How to change speed unit MPH to KMH?
To change the speed unit from US/Imperial to Metric or MPH to KMH (KPH):
Change speed unit to KPH ( Km/h, METRIC) or MPH in GENERAL > Unit section, here is an example for the SLI-PRO device:
Speedlimiter doesnt work on rfactor why?
You do not have the official DIGITAL release of rFactor. Check the installation FAQ HERE and update your rFactor version.
Disable native support of FANATEC in Automobilista
Disable Fanatec (CSW or others) native support of Automobilista to use Ledsmaster:
You must QUIT Automobilista first
open your Automobilista profile in your ../Steam/steamapps/Automobilista directory
open UserData/Controller
and edit your current Fanatec profile to change:
Use Additional Hardware Features=”1” // Whether to use additional hardware features like steering wheel LED
Hardware 3Digit Display=”1″ // If hardware has 3-digit display, 0=off, 1=gear, 2=speed
to
Use Additional Hardware Features=”0” // Whether to use additional hardware features like steering wheel LED
Hardware 3Digit Display=”0” // If hardware has 3-digit display, 0=off, 1=gear, 2=speed
Related FAQ:
Configure your game or simulation to send telemetry data
LED seem to freeze on turns using Fanatec. Why?
Your shiftlights (REV LED) of your displays and steering wheel seem to freeze on turns using Fanatec hardware and you do not have any CSP V2 and CSP V3 pedals set. You activated by error the CSP ABS/THROTTLE effects but your do not have the CSP connected. Deactivate them by putting their values at ZERO (0).
Edit your Fanatec configuration, go to Advanced Options (settings > FANATEC ) and set values of fanatec csp throttle effect and fanatec csp abs effect to 0 (zero)
Make sure to APPLY, SAVE and RESTART Ledsmaster.
When OSP (Optimal Shift Point) is triggered?
Why the first time I enter the track OSP isn’t triggered when gear 4 and beyond are engaged?
Almost all major racing game include the max forward gears value but some don’t so read this to understand what’s going on when the telemetry value is not provided by the game:
1) OSP by default start with gear 2 and don’t use the last gear (you can change this in setup)
2) OSP by default use the MAX FORWARD GEARS AT STARTUP info to determine the max forward gears of current car (almost all simulations API does not provide this info)
3) At startup OSP works only with gear 2 and 3, excepted if you change the MAX FORWARD GEARS AT STARTUP in your setup because the simulation API doesn’t give us the number of gears of current car
Conclusion, if you want to have an OSP up and ready at startup, you have two choices:
1) you drive only ONE type of car so you can change MAX FORWARD GEARS AT STARTUP with a fixed value (i.e. using always F1 cars = 7 )
2) you drive more than one type of car (i.e. GT and F1 ), so when you go on the track engage all gears before leaving the stand
Most common error with Simbin GTR2 and other Simbin games?
You need to change your PLR file (Simbin Profile) before using SLIMax Mgr and your USB device.
Search for “Write Shared Memory” and set it to “1“. see the Simbin section for more details.
For info:
the GTR2 Setup (PLR) is on .\GTR2\UserData\PLAYER\PLAYER.PLR
where PLAYER = your GTR2 player name
open this file with notepad.exe and follow FAQ instructions
7 Basic Hardware Info
SLI-PRO, number of each LED in order:
Here the number of each LED in order:

can I break the display sli pro if I connect it to playstation 3?
SLI-PRO device will not work with your PS3, do not connect it.
How do I know what number represents which SLI-M Led?
From left to right (on std led layout of SLI-M ):
blue = 1
yellow = 2
red = 3
..
yellow = 4
red = 5
blue = 6
SLI Device BU0710 isn’t recognized by Windows and the led are fully highlighted when I connect it, why?
the shift light is always in the full lighted position, why?
the Device is tagged with a WARNING icon in the Devices list, why?
the device isn't recognized by Windows, why?

Your BU0710 device firmware from Leo Bodnar is old (more then 15-years-old) and no longer supported. it isn’t fully compatible with the new USB2.0 or USB3.x, Windows do not recognize the device connected to your computer directly or to an USB2 or USB3 Hub, You have to plug/unplug it several times to get your device ready.
Open the Devices And Printers manager of Windows to check if the icon of your device is correct and the device recognized by Windows.
 |
|
| BAD CONNECTION | OK |

How To Use Your Codemasters DiRT Rally 2.0, DiRT4 With Simucube FW or MMOS OSW?
UPDATED by Zappadoc 2019-02-26
How to get ffb with your Codemasters games DiRT Rally 2.0 and DiRT 4 using your simucube osw direct drive?
IMPORTANT: don’t trust guys around which give you the wrong information. Double check your device settings and compare with the line below, This is the correct way to declare your DD to be able to choose between Direct Drive driver and DR2.0 FFB settings, With the correct parameters this will greatly improve the FFB in Dirt Rally 2.0 and please add the link to this page which is updated regularly and do not just copy/past these info. Thanks.
The current DR2.0 FFB will not give you as much surface information as the DR1.0 but you can play with params to improve it. Beware all grayed settings are in fact perfectly usable. After a lot of game and simucube FFB tweaks, the feeling should be closer to DR1 but more attenuated unfortunately. We are all waiting for an FFB bug fix from Codemasters.
MMOS
DiRT 4 and DiRT Rally 2.0 MOD FOR SIMUCUBE MMOS MANAGEMENT
For OSW Simucube users, you have to enter the description of the device manually and create the corresponding generic actionmap file. I posted the instructions in Codemasters forum and here.
ATTENTION: THIS MOD DOESN’T CONTAIN ANY FFB PARAMETERS,
This allows the game to recognize the mmos device as a DD steering wheel only.
in game directory
input directory
device_defines.xml
after <!– comments –>
add this line:
<device id="{0FFBF055-0000-0000-0000-504944564944}" name="simucube_osw_mmos" priority="100" type="wheel" official="false" />
IMPORTANT: don’t trust guys around which give you the wrong information. Double check your device settings and compare with the line above, This is the correct way to declare your DD to be able to choose between Direct Drive driver and DR2.0 FFB settings, With the correct parameters this will greatly improve the FFB in Dirt Rally 2.0 and please add the link to this page which is updated regularly and do not just copy/past these info. Thanks.
in actionmap directory
create a xml file with Notepad++ named
simucube_osw_mmos.xml
with:
the xml file below is in attachment
<?xml version="1.0" encoding="utf-8"?>
<action_map name="simucube_osw_mmos" device_name="simucube_osw_mmos" library="lib_direct_input">
  <group name="driving">
    <action name="change_view">
      <axis name="di_button_6" />
    </action>
    <group name="gear">
      <group name="sequential">
        <action name="up">
          <axis name="di_button_10" />
        </action>
        <action name="down">
          <axis name="di_button_5" />
        </action>
      </group>
    </group>
    <action name="handbrake">
      <axis name="di_button_8" />
    </action>
    <action name="headlights">
      <axis name="di_button_11" />
    </action>
    <group name="look">
      <action name="back">
        <axis name="di_button_7" />
      </action>
    </group>
    <action name="pause">
      <axis name="di_button_14" />
    </action>
    <action name="reset_vehicle">
      <axis name="di_button_9" />
    </action>
    <action name="roadside_repair">
      <axis name="di_button_1" />
    </action>
    <group name="steer">
      <action name="left">
        <axis name="di_x_axis" type="lower" deadzone="0.0" saturation="1.0" />
      </action>
      <action name="right">
        <axis name="di_x_axis" type="upper" deadzone="0.0" saturation="1.0" />
      </action>
    </group>
    <action name="wipers">
      <axis name="di_button_13" />
    </action>
  </group>
  <group name="school">
    <action name="instructor_recap">
      <axis name="di_button_3" />
    </action>
  </group>
  <group name="menu">
    <group name="button">
      <action name="3">
        <axis name="di_button_2" />
      </action>
      <action name="4">
        <axis name="di_button_4" />
      </action>
      <action name="start">
        <axis name="di_button_1" />
      </action>
      <action name="select">
        <axis name="di_button_15" />
      </action>
      <group name="shoulder">
        <action name="left">
          <axis name="di_button_5" />
        </action>
        <action name="right">
          <axis name="di_button_10" />
        </action>
      </group>
    </group>
    <group name="navigate">
      <action name="back">
        <axis name="di_button_11" />
      </action>
      <action name="select">
        <axis name="di_button_13" />
      </action>
      <action name="cancel_keybinding">
        <axis name="di_button_14" />
      </action>
    </group>
    <group name="view">
      <action name="left">
        <axis name="di_x_axis" type="lower" deadzone="0.0" saturation="1.0" />
      </action>
      <action name="right">
        <axis name="di_x_axis" type="upper" deadzone="0.0" saturation="1.0" />
      </action>
    </group>
  </group>
  <group name="replay">
    <action name="exit">
      <axis name="di_button_11" />
    </action>
    <action name="forward">
      <axis name="di_x_axis" type="upper" deadzone="0.0" saturation="1.0" />
    </action>
    <action name="rewind">
      <axis name="di_x_axis" type="lower" deadzone="0.0" saturation="1.0" />
    </action>
    <action name="pause">
      <axis name="di_button_13" />
    </action>
    <group name="toggle">
      <action name="music">
        <axis name="di_button_6" />
      </action>
      <action name="ui">
        <axis name="di_button_12" />
      </action>
    </group>
    <group name="camera">
      <action name="previous">
        <axis name="di_button_5" />
      </action>
      <action name="next">
        <axis name="di_button_10" />
      </action>
    </group>
  </group>
  <group name="network">
    <group name="toggle">
      <action name="voice">
        <axis name="di_button_3" />
      </action>
    </group>
  </group>
</action_map>
DOWNLOAD simucube_osw_mmos xml
Unzip and copy the xml file in the correct directory
new “flavor” actionmap with minimal settings, use load preset in game settings to restore this minimal settings:
create a xml file with Notepad++ named
simucube_osw_mmos_minimal.xml
with:
<?xml version="1.0" encoding="utf-8"?>
<action_map name="simucube_osw_mmos_minimal" device_name="simucube_osw_mmos" library="lib_direct_input">
  <axis_defaults>
    <axis name="di_x_axis">
    <action deadzone="0" name="driving.steer.left" />
    <action deadzone="0" name="driving.steer.right" />
    </axis>
  </axis_defaults>
  <group name="driving">
    <group name="steer">
      <action name="left">
       <axis name="di_x_axis" type="lower" />
      </action>
     <action name="right">
      <axis name="di_x_axis" type="upper" />
    </action>
  </group>
 </group>
</action_map>
DOWNLOAD simucube_osw_mmos_minimal
Unzip and copy the xml file in the correct directory
Simucube FW
DiRT 4 and DiRT Rally 2.0 MOD FOR NATIVE SIMUCUBE FW MANAGEMENT
![]()
For OSW Simucube users, you have to enter the description of the device manually and create the corresponding generic actionmap file. I posted the instructions in Codemasters forum and here.
ATTENTION: THIS MOD DOESN’T CONTAIN ANY FFB PARAMETERS,
This allows the game to recognize the mmos device as a DD steering wheel only.
in game directory
input directory
device_defines.xml
after <!– comments –>
add this line:
<device id="{0D5A16D0-0000-0000-0000-504944564944}" name="simucube_osw" priority="100" type="wheel" official="false" />IMPORTANT: don’t trust guys around which give you the wrong information. Double check your device settings and compare with the line above, This is the correct way to declare your DD to be able to choose between Direct Drive driver and DR2.0 FFB settings, With the correct parameters this will greatly improve the FFB in Dirt Rally 2.0 and please add the link to this page which is updated regularly and do not just copy/past these info. Thanks.
in actionmap directory
create a xml file with Notepad++ named
simucube_osw.xml
with:
the xml file below is in attachment
<?xml version="1.0" encoding="utf-8"?>
<action_map name="simucube_osw" device_name="simucube_osw" library="lib_direct_input">
  <group name="driving">
    <action name="change_view">
      <axis name="di_button_6" />
    </action>
    <group name="gear">
      <group name="sequential">
        <action name="up">
          <axis name="di_button_10" />
        </action>
        <action name="down">
          <axis name="di_button_5" />
        </action>
      </group>
    </group>
    <action name="handbrake">
      <axis name="di_button_8" />
    </action>
    <action name="headlights">
      <axis name="di_button_11" />
    </action>
    <group name="look">
      <action name="back">
        <axis name="di_button_7" />
      </action>
    </group>
    <action name="pause">
      <axis name="di_button_14" />
    </action>
    <action name="reset_vehicle">
      <axis name="di_button_9" />
    </action>
    <action name="roadside_repair">
      <axis name="di_button_1" />
    </action>
    <group name="steer">
      <action name="left">
        <axis name="di_x_axis" type="lower" deadzone="0.0" saturation="1.0" />
      </action>
      <action name="right">
        <axis name="di_x_axis" type="upper" deadzone="0.0" saturation="1.0" />
      </action>
    </group>
    <action name="wipers">
      <axis name="di_button_13" />
    </action>
  </group>
  <group name="school">
    <action name="instructor_recap">
      <axis name="di_button_3" />
    </action>
  </group>
  <group name="menu">
    <group name="button">
      <action name="3">
        <axis name="di_button_2" />
      </action>
      <action name="4">
        <axis name="di_button_4" />
      </action>
      <action name="start">
        <axis name="di_button_1" />
      </action>
      <action name="select">
        <axis name="di_button_15" />
      </action>
      <group name="shoulder">
        <action name="left">
          <axis name="di_button_5" />
        </action>
        <action name="right">
          <axis name="di_button_10" />
        </action>
      </group>
    </group>
    <group name="navigate">
      <action name="back">
        <axis name="di_button_11" />
      </action>
      <action name="select">
        <axis name="di_button_13" />
      </action>
      <action name="cancel_keybinding">
        <axis name="di_button_14" />
      </action>
    </group>
    <group name="view">
      <action name="left">
        <axis name="di_x_axis" type="lower" deadzone="0.0" saturation="1.0" />
      </action>
      <action name="right">
        <axis name="di_x_axis" type="upper" deadzone="0.0" saturation="1.0" />
      </action>
    </group>
  </group>
  <group name="replay">
    <action name="exit">
      <axis name="di_button_11" />
    </action>
    <action name="forward">
      <axis name="di_x_axis" type="upper" deadzone="0.0" saturation="1.0" />
    </action>
    <action name="rewind">
      <axis name="di_x_axis" type="lower" deadzone="0.0" saturation="1.0" />
    </action>
    <action name="pause">
      <axis name="di_button_13" />
    </action>
    <group name="toggle">
      <action name="music">
        <axis name="di_button_6" />
      </action>
      <action name="ui">
        <axis name="di_button_12" />
      </action>
    </group>
    <group name="camera">
      <action name="previous">
        <axis name="di_button_5" />
      </action>
      <action name="next">
        <axis name="di_button_10" />
      </action>
    </group>
  </group>
  <group name="network">
    <group name="toggle">
      <action name="voice">
        <axis name="di_button_3" />
      </action>
    </group>
  </group>
</action_map>
Unzip and copy the xml file in the correct directory
new “flavor” actionmap with minimal settings, use load preset in game settings to restore this minimal settings:
create a xml file with Notepad++ named
simucube_osw_minimal.xml
with:
<?xml version="1.0" encoding="utf-8"?>
<action_map name="simucube_osw_minimal" device_name="simucube_osw" library="lib_direct_input">
  <axis_defaults>
    <axis name="di_x_axis">
    <action deadzone="0" name="driving.steer.left" />
    <action deadzone="0" name="driving.steer.right" />
    </axis>
  </axis_defaults>
  <group name="driving">
    <group name="steer">
      <action name="left">
       <axis name="di_x_axis" type="lower" />
      </action>
     <action name="right">
      <axis name="di_x_axis" type="upper" />
    </action>
  </group>
 </group>
</action_map>Unzip and copy the xml file in the correct directory
Fanatec Podium
DiRT 4 and DiRT Rally 2.0 MOD FOR FANATEC PODIUM DD1/DD2
Coming soon…
Tutorial Video
French tutorial video by Franconen – HowTo Activate FFB
French tutorial video by Franconen – HowTo Improve FFB


Led of my Logitech steering wheel not working, why?
Your Logitech G29 or G923 or PRO RACING WHEEL rev-led (shiftlights) is not working properly on Windows 10 or Windows 11
Unfortunately there’s a significant issue with G HUB driver on Windows 10/11 which prevent to get access to the rev led (shift-lights) features from SLIMax Manager Pro or from game apps. Sometime this is working after uninstalling G HUB or just quitting G Hub but most of the time it doesn’t work. however, everything is working as expected on Windows 7 using G HUB for Windows 7.
G27 use its own driver and not G HUB so it works.
To get your rev-led ready for SLIMax Manager Pro do not install G Hub but “Logitech Gaming software” (LGS). The steering wheel driver is correctly installed even if LGS indicates no usb device detected after installation (it’s safe to uncheck run at startup in LGS settings and exit LGS).
Follow these links below to download the corresponding version:
Windows 10/11 64-bit
https://download01.logi.com/web/ftp/pub/techsupport/gaming/LGS_9.04.49_x64_Logitech.exe

Windows 8/7 64-bit
https://download01.logi.com/web/ftp/pub/techsupport/gaming/LGS_9.02.74_x64_Logitech.exe

Logitech Gaming Software Download link:
https://support.logi.com/hc/en-us/articles/360025298053
Does I need to upgrade my firmware device and how to?
Of course, you need to be up to date BUT be sure to check your firmware version before doing so!
** DO NOT UPGRADE YOUR FIRMWARE IF YOU DON’T NEED IT ** this will never solve your problem.
Where to find the specs of SLI hardware?
Hardware specs can be found directly from hardware supplier website.
How to wire the buttons, encoders and switches onto the device?
Ask your hardware supplier for hardware related questions. Here is some basic info for your convenience:
Here is a basic SLI-M wiring diagram:

For SLI-PRO owner download the USER Manual here .
Where to find the std default wiring diagram of SLI-PRO?
Standard Wiring Diagram of button 1 and 2 (can be assigned to Quick Info Button – QI – function using Controls Mapping Panel ).

Standard Wiring Diagram of 12positions SPEED and TIME Switches (left and right digits functions).
The corresponding settings tags are:LEFTDIGITSPANELS = …
RIGHTDIGITSPANELS = …

Standard Wiring Diagram of SPEED, TIME and Brightness rotary encoders.
The corresponding settings tags are:
BRITLESSCTRLDOWN = 7
BRITMORECTRLUP = 8
LEFTDIGITSCTRLDOWN= 3
LEFTDIGITSCTRLUP= 4
RIGHTDIGITSCTRLDOWN= 5
RIGHTDIGITSCTRLUP= 6


Standard Wiring Diagram of Potentiometer (using for 3 states clutches).
EDIT: Not used by SLIMax Manager


Standard wiring for USB connector:
